
Whether you’re an embroidery veteran or simply looking to try something new whilst getting into the camp spirit, look no further! This tutorial will show you all the basic cross stitch skills needed to make your very own unique (and completely legendary!) camp keepsake to cherish for years to come.
This activity is something for you to do and enjoy at your own pace, and you can customise the colours used to suit you – I personally used the colours from the Geek Girls logo with a bit of gold thrown in as that is a theme colour for this year’s camp!
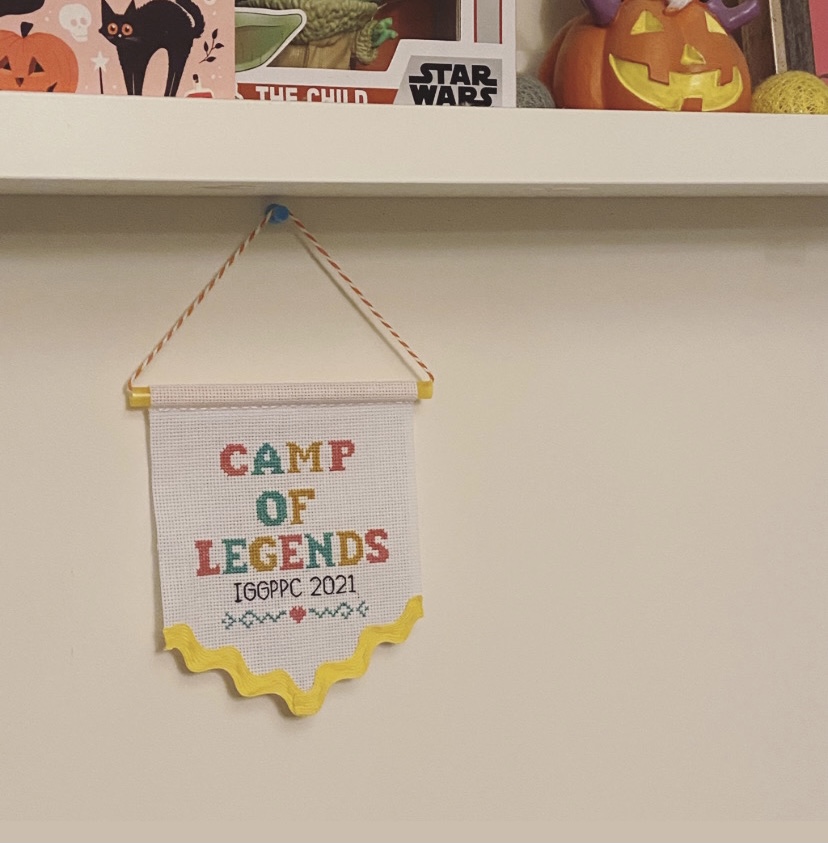
The photos in this tutorial show the hanging flag version of this pattern, but you can use an embroidery hoop, photo frame or simply leave it organic to display – the choice is yours!
Supplies:
- 8”x8” square of Aida (I used 16 count in white, but you whatever you have is fine!)
- 1-5 embroidery threads (the pattern provided lists the colours I personally used but you are
- free to use whatever colour(s) you like!)
- Embroidery needle
- Scissors
- Optional extras – embroidery hoop (5” or 6” is recommended), 1 craft/drinking straw, a length of string/twine/wool, approx. 7” of decorative trimming
Legendary Stitchers Instructions:
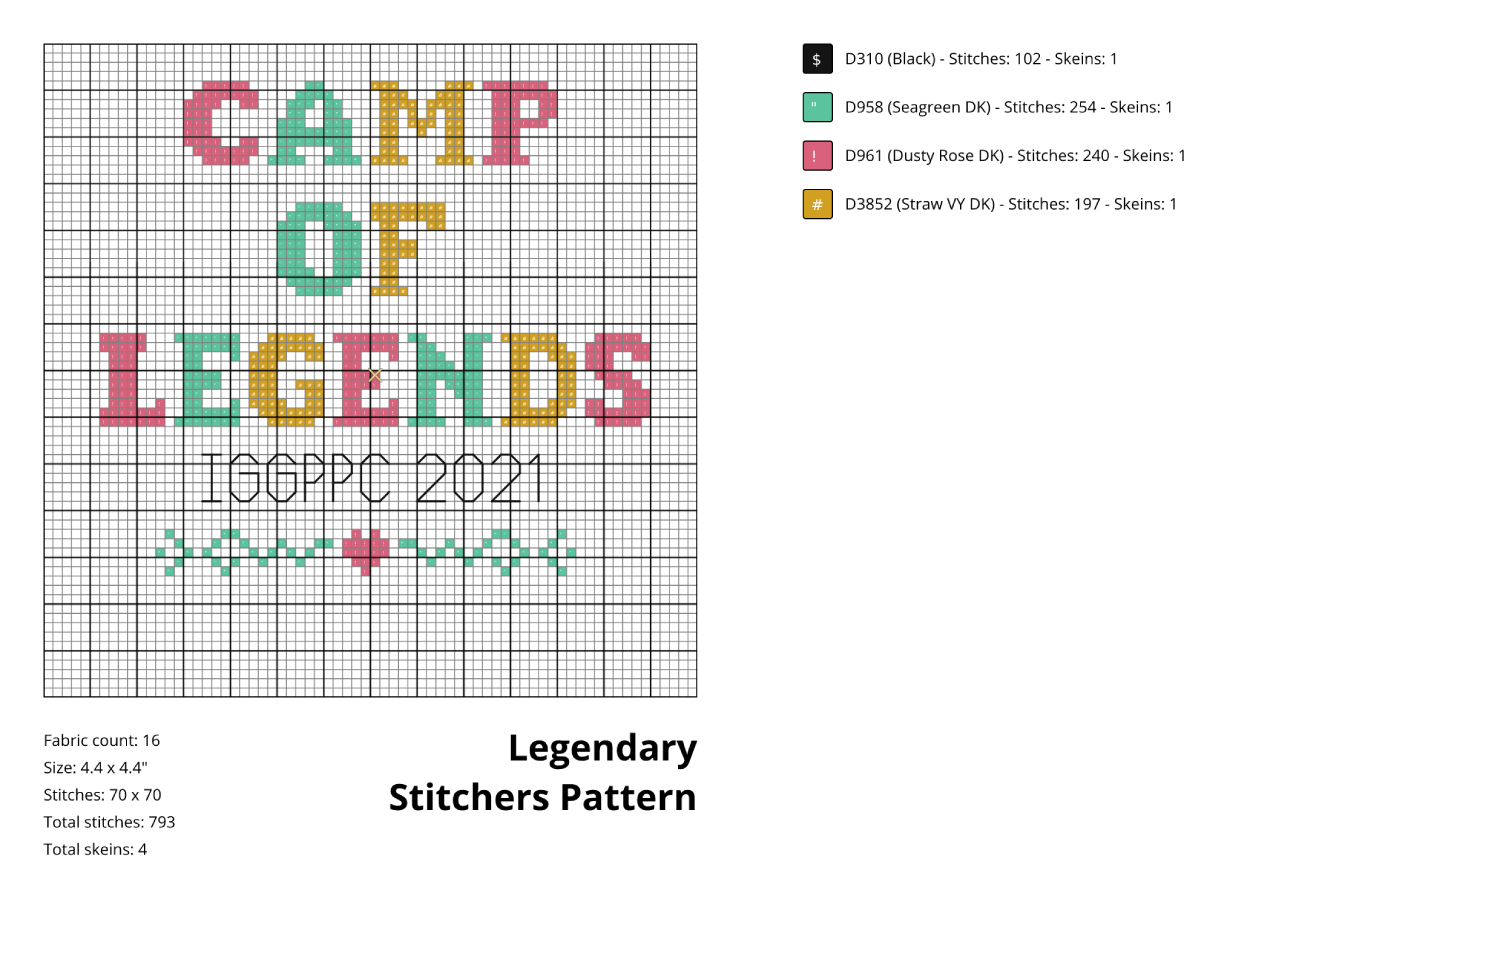
Firstly, take a look at the pattern (clicking opens a high resolution PDF) and decide on your colour scheme and get all your materials ready!
Take your Aida and find the centre (you can either do this by counting or by folding it in half horizontally and vertically to find the point the lines meet)
Using the pattern provided, there will be an ‘X’ which is the central stitch – for ease to all, use this as you first stitch and work your way around the pattern from there (if you get stuck and need a little extra help then please feel free to contact me!)
Going back to the pattern and the “X” – take the thread you wish to use for this section and cut a length (I recommend using around 12”-18” lengths but you know what a workable length is for you!)
There should be 6 individual strands of thread making up the length, you need to split this into groups of 2 strands (again, if you get stuck please reach out!) and thread your needle (do not knot the end of the thread!)
You are now ready to start your journey to becoming a legendary stitcher!
I have also included a link to a page that has some great information for beginners! (Particularly Step 6)
Instructions on Finishing:
Depending on your preferred method, there are many ways you can finish and display your cross stitch. You can leave it as it is, frame it using an embroidery hoop or even turn it into a hanging flag!
For this particular project I decided to turn my finished stitch into a hanging flag. To do this, you will need;
- Your finished cross stitch
- A craft/drinking straw
- A length of string/twine/wool
- Optional; Decorative trimming
Firstly, you need to trim your stitch into shape! I started by trimming down the side edges. Using the word ‘Legends’ as a guide (as this is the widest part of the stitch) I marked a 3⁄4” gap on each side of the word and trimmed in a straight line from top to bottom.
Next, along the top edge I marked a 2” gap from the top of the word ‘Camp’ and trimmed a straight line across the top (you may need to mark a slightly larger cap depending on the width of your straw)
Now onto trimming the bottom! I trimmed mine into a point – to do this you need to mark 1 1⁄2” from the bottom of the heart. Next, fold the cross stitch in half and using the mark as your starting point, trim diagonally so that when you unfold you have a point! I did this part by eye so just be sure not to go up to far or cut any of your stitching.
Next I added the trimming along the bottom of the pointed part. I did this by using hot glue, but craft glue or stitching will work just as well (If you aren’t adding a trim skip this part)
Finally, we need to attach the straw and string to enable us to hang it up!
First, cut the straw to length (I used my top edge as a guide and added around 1⁄2” extra).
Now you need to fold the top edge over the straw, and leave yourself enough fabric so that you can either stitch or glue this into place.
Lastly, cut a length of string (3x the length of the straw will be more than enough!) thread it through the straw and secure with a knot.
There you have it – your very own legendary camp cross stitch flag to display!
I hope you enjoyed learning something new with me but if you get stuck and need a little extra guidance then you can find me on Discord as Gemmily/Counsellor Echo.
I would also love to see your beautiful creations which you can share with me on Discord or Instagram @gemmilyacnh
Happy Camping and Happy Crafting!
Contributed by Gemma, aka Counselor Echo
Gemma is a simple soul who is happiest when snuggled under a blanket with a cup of tea and her switch. Gemma’s best friend is her Frenchie who is almost always by her side (so if your snacks disappear or you hear a strange noise from your bunks at night it’s probably just him!) She loves the colour lilac, wears sunglasses 365 days a year and likes to pretend that every day is Halloween. Her days are filled with an abundance of magic, creativity, curiosity and love which she can not wait to share with you all! You can find Counsellor Echo on Twitter @gemmilyecho or Instagram @gemmilyacnh

Leave A Comment
You must be logged in to post a comment.