Happy December, fellow Iggles! We are finally at the end of a very, very long year. Many of us are happy to see the end of 2020 and hoping for an easier 2021. For now, many people in the Northern Hemisphere are cozying down for winter and preparing for a variety of holidays across the globe. No matter the weather outside or your holiday of choice, a common theme for this season is the theme of hope. More than ever, we need some hope that things will get better (and they will!). Nothing represents hope more than stars, those little pinpricks of light against the darkness of space. So, our project for this month is a simple embroidered starry night sky!

Supplies
- Cotton linen fabric (something with a tight weave)
- Embroidery hoop
- Tapestry needle, size 22-26
- Scissors
- Embroidery floss
- Glue
- Fabric marker
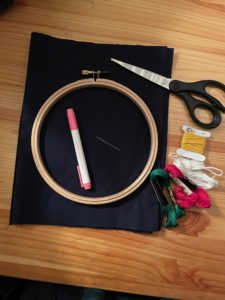
I ended up using a 6″ hoop so I had some room to space out the stars. I also chose some cotton fabric that was a dark indigo color to resemble the sky at night but I imagine that white fabric may be easier to trace a pattern out ahead of time.
Place the fabric in the embroidery hoop and trim the edges down to an inch (you can do this afterwards as well).
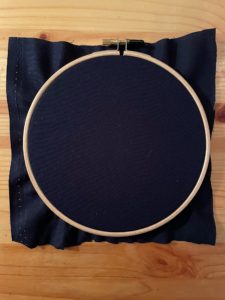
If your fabric is light, you can use a fabric marker to draw out where you would like your stars to be ahead of time. My fabric was too dark for this so I ended up winging it!
Big Stars
For the larger stars, I used a tutorial from Wandering Threads Embroidery. Notice that my stars did NOT turn out as nicely as they do in her tutorial! I used the full six strands of floss to make these stars, which was a little difficult to thread. I cut strands to about arm’s length. You can mix it up with these stars, making them bigger or smaller. I noticed that if I went for a diameter of less than an inch, the points lost their shape.
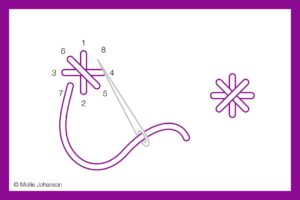
Little Stars
For the small stars, I did a version of a star stitch nicknamed the twinkle stitch, which is a simple embroidery stitch using straight stitches. I used two strands of floss to make these stars a bit smaller. The picture below shows the order of stitches that you make. Come from the back at 1 and down at 2, up at 3 and down at 4, up at 5 and down at 6, and finally up at 7 and down into 8. I trimmed the thread in the back and started fresh for a new star stitch.
Happy stitching!
When you post on Twitter or Instagram, use the hashtag #IgglesCreate to share your progress and see how your fellow Iggles are faring! Feel free to tweet at me or message me on Instagram if you have questions or concerns! Follow @IgglesCreate on Twitter for this and other creative activities every month!
What do you think of this month’s project? And more importantly, what project or pattern would you like to see next? Comment below with suggestions!

Leave A Comment
You must be logged in to post a comment.