Look, we’ve all been there. It’s just a few days before Halloween, and you’ve procrastinated getting your costume. Now you’re wondering if it’s even worth trying to scrounge something together, and watching scary movies in your pajamas eating discount candy is sounding better by the second, right? Well you’re in luck! I’ve created 10 different nail art designs you can use as inspiration for a spooky manicure, which totally still counts as a costume. There’s a few different kind of vibes, but feel free to make them your own!
Supplies:
For clean up:
- Paper towels
- Cotton pads (or balls/swabs, whatever your preference)
- Rubbing alcohol and a small dish to hold it
- Acetone or nail polish remover
For painting:
Nail polish colors – these are just the colors I used, feel free to switch any of the colors around, get creative and see what looks you can come up with!
Blood drips could easily be neon green slime and pastels can take something from spooky to cute n’ spooky. If you don’t have the color you want, try and experiment with blending your own! Use whatever you have available.
- Base coat
- Top coat – high shine, matte optional
- Black
- White
- Blood red
- Gray
- Dark green
- Midnight blue
- Light green
- Silver
- Pastel purple
- Neon orange, yellow, red, green, pink, blue, purple, green
Nail art tools – if you don’t have nail art specific brushes that’s totally fine! You can use the ends of paint brushes and sewing pins for dotting tools, and plain paint brushes will be fine! As long as they’re small/thin enough you won’t be able to tell the difference.
- Medium length fine liner
- Various sizes of dotting tool
- Flat head brush – helpful for cleaning up mistakes with the rubbing alcohol
- Something to use for a paint palette
- UV/LED lamp (if using gel)
Instructions:
Before diving in, here’s a few tips if you haven’t done nail art before:’
Go slow and relax! If you make a mistake, you can easily fix it with a brush dipped in a little bit of rubbing alcohol, or, if it’s dry, it’s perfectly okay to start over if you don’t like it! I will sometimes do the same design 2 or 3 times before I nail it (pun very much intended). To help steady your hand, rest the pinky of the hand you’re painting with on a finger of the other hand.
Flaws are fun! We’re not going to nail it every time, unfortunately. So don’t worry about any flaws or mistakes! It’s okay if your lines are a little wobbly, the important part is just having fun and expressing your creativity. Remember the wise words of our beloved Bob Ross: there’s no mistakes, just happy accidents.
A little goes a long way! It’s a tiny canvas, so tiny dollops of polish are all you need. I like to use a separate paint palette for this, so I can dab off the excess polish. I use gel, which doesn’t dry, so if you’re using regular polish you’ll want to be sure it doesn’t dry out. You can always get more if you need it. When starting to paint your designs, start smaller than you think you want, because filling and expanding it will be easier than trying to take it away. Also, if you intend to layer one color on top of another, make sure the bottom layer is cured/dry, otherwise the colors will blend.
Give your art staying power! Make sure your beds are clean and dry by wiping them with some rubbing alcohol before applying your base coat. A good quality base and top coat to seal will help extend the life of your manicure. Finish off with some cuticle oil, because the scariest thing you face this Halloween shouldn’t be your dry, cranky cuticles.
Halloween Nail Art Patterns:
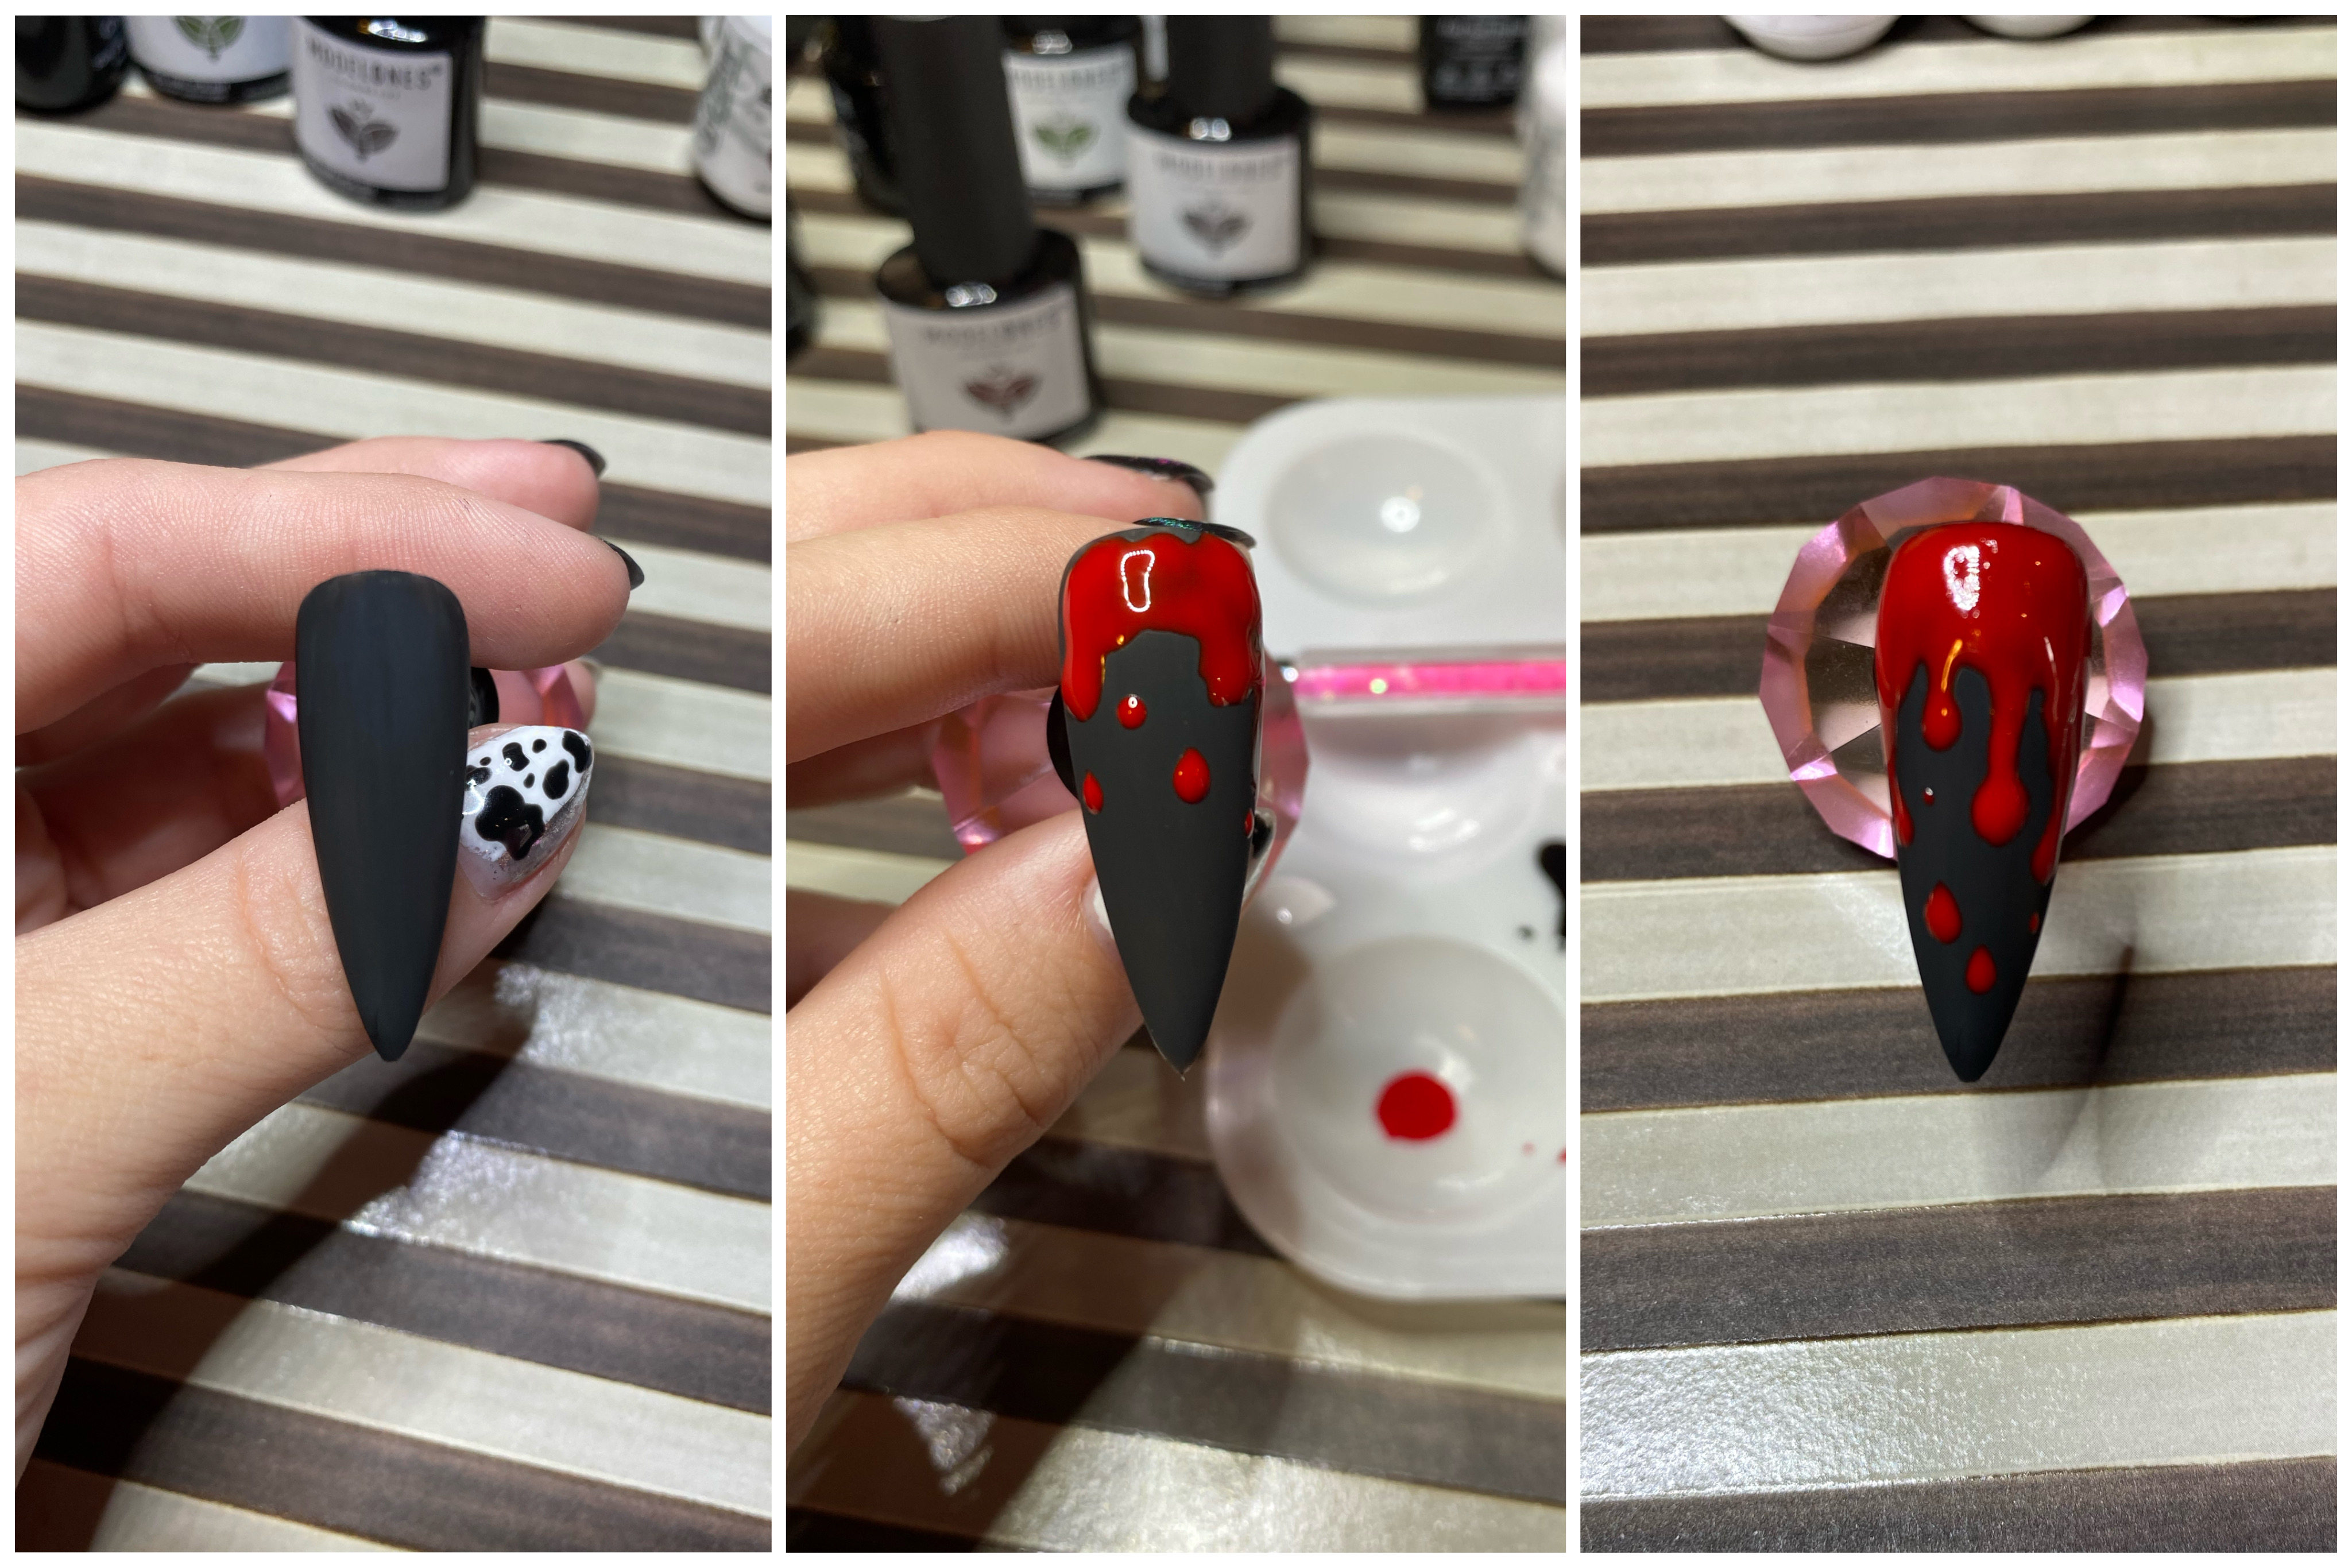
1. Bloody Claws
– Apply your base coat and cure/dry.
– Apply 1 or 2 coats of black polish and cure/dry.
– Optional: Apply one even coat of matte top coat. This creates a fun textural contrast from the high shine blood drips, but if you don’t want to do it you can move on to the next step!
– Starting near the cuticle, paint a bit of blood red, (don’t worry about it being super neat, oozy is good in this case), and place a few droplets to position your drips.
– While the polish is still wet, use a fine liner to connect the droplets by carefully extending a line of polish from the droplet up towards the cuticle. You can spread everything around with the fine liner until you like the look of it, add in a few extra droplets, then cure/dry. This will have a slightly raised surface on the blood drops.
– Use a fine liner to carefully apply top coat to the blood drips, or apply to the whole nail if you skipped the matte top coat, and cure/dry.
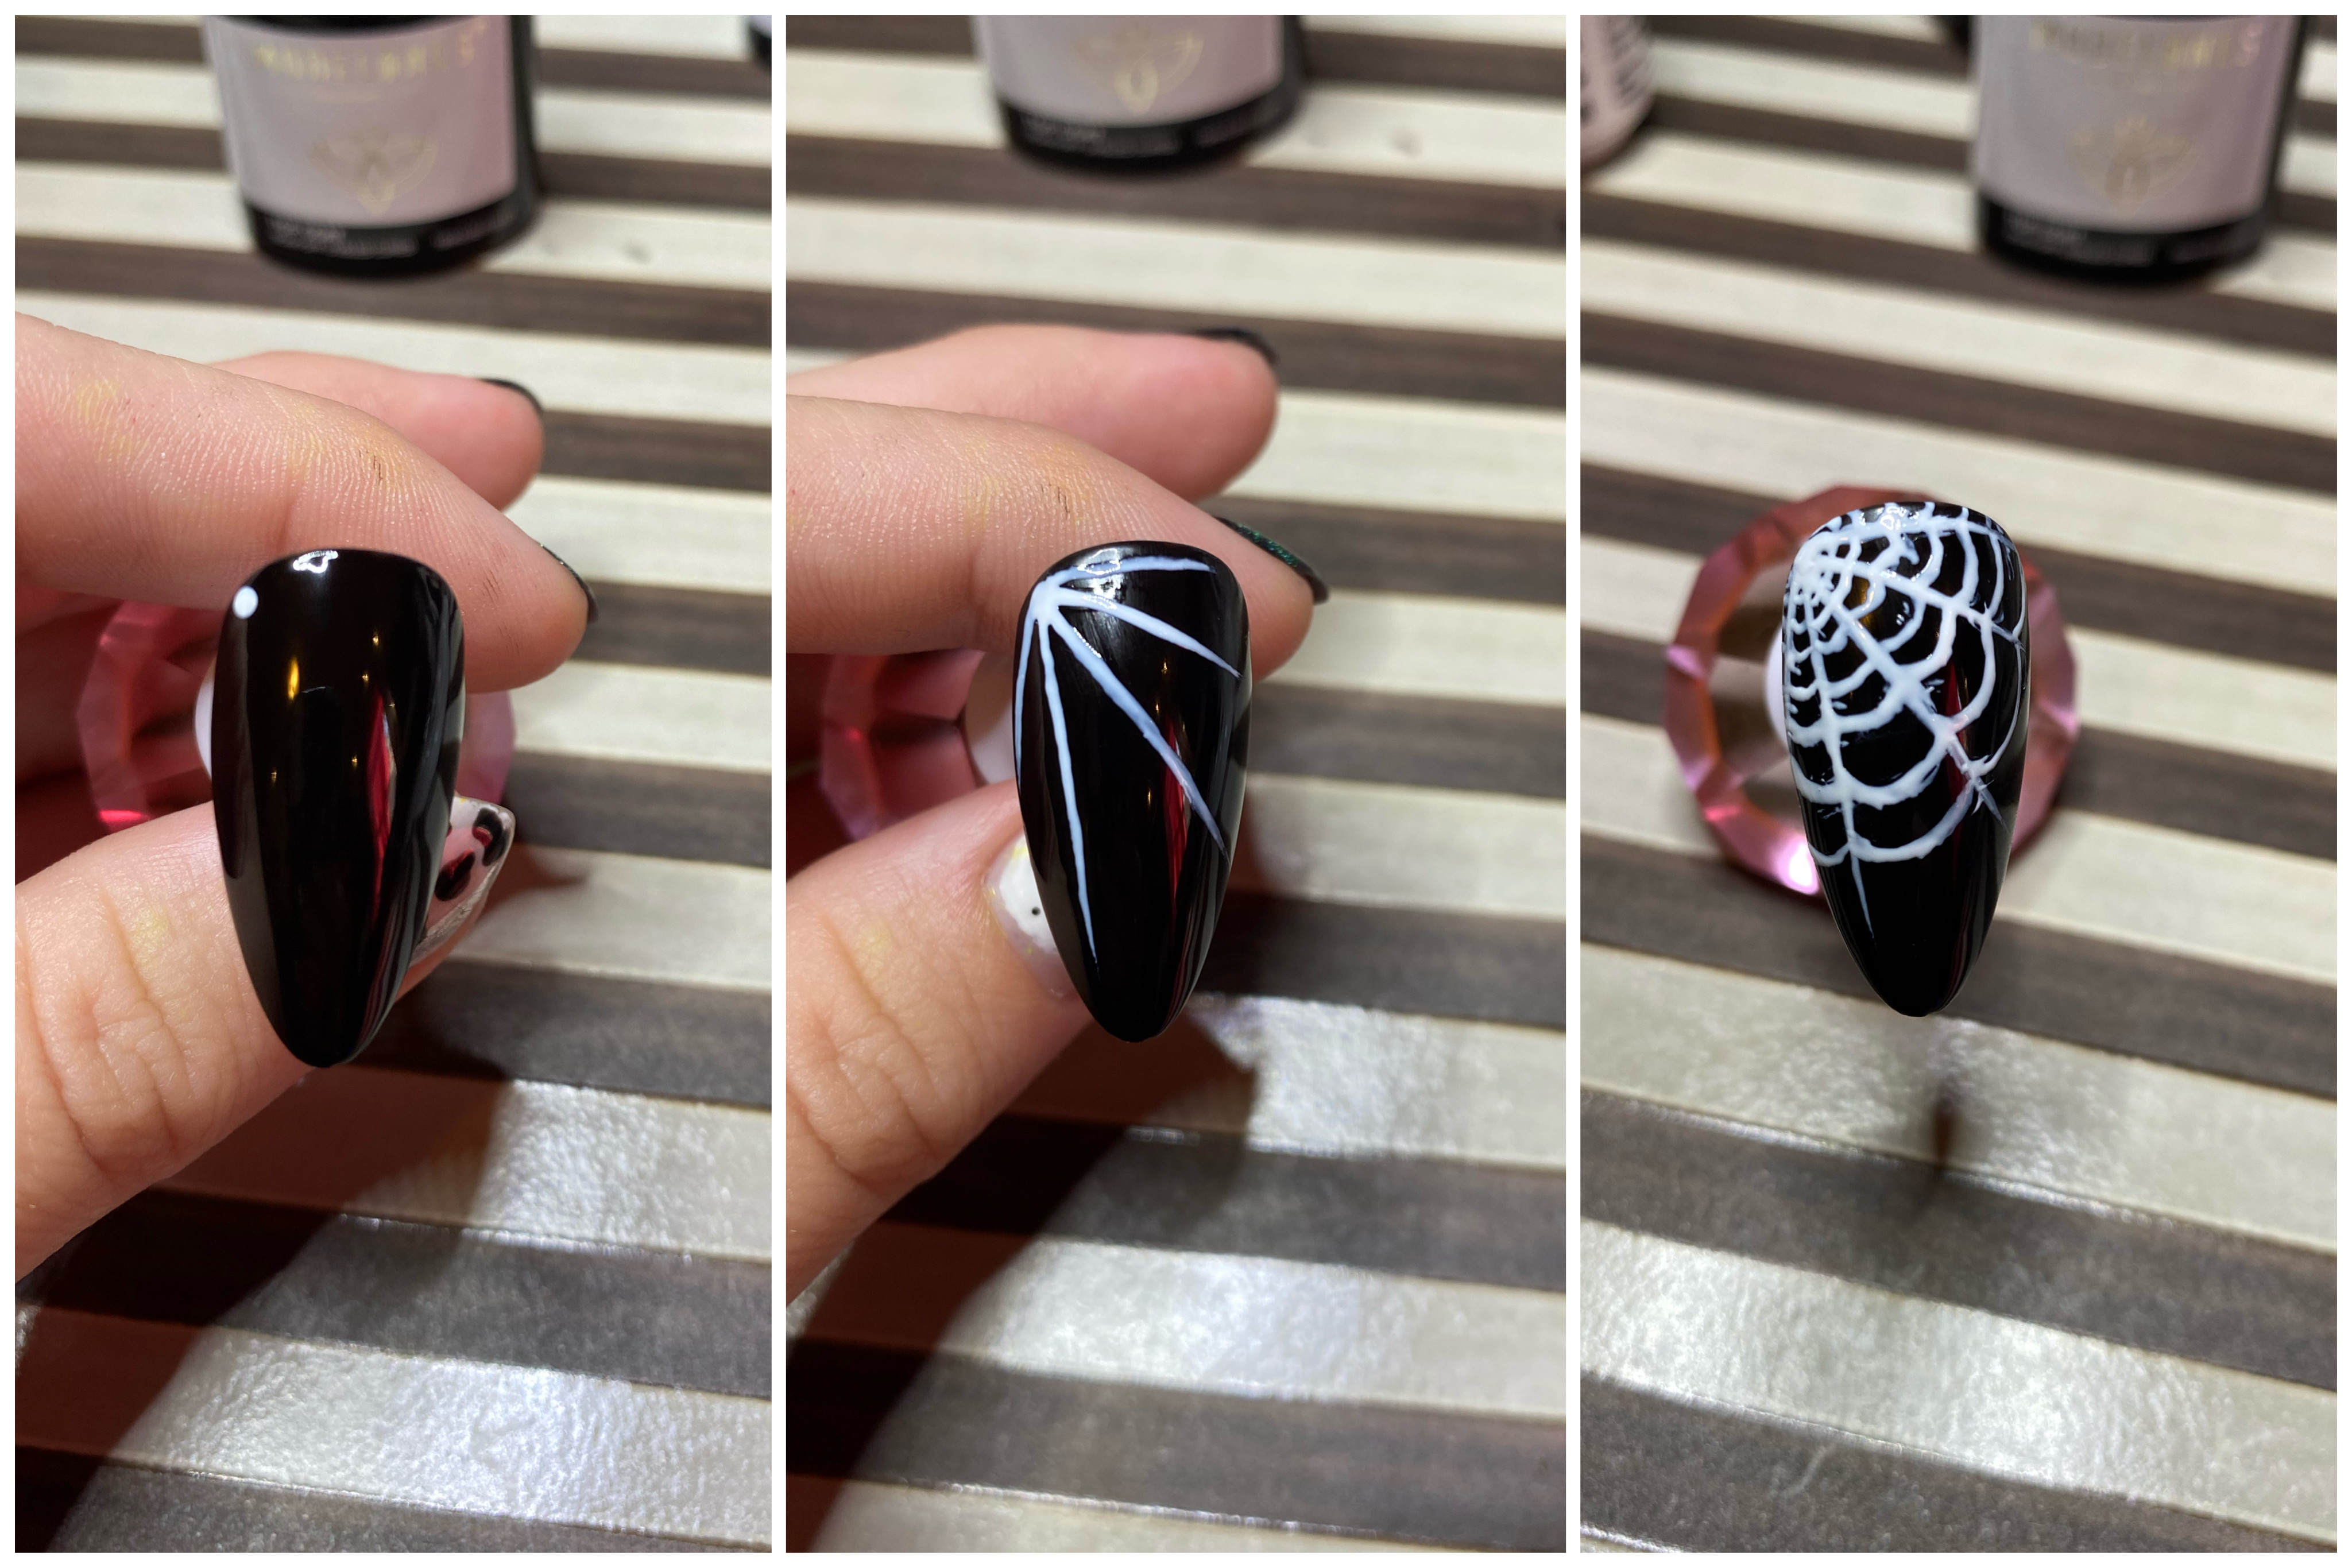
2. Web Weaving
– Apply your base coat and cure/dry.
– Apply 1 or 2 coats of black polish and cure/dry.
– With a dotting tool, place a small dot of white polish where you want to anchor your web.
– While the polish is still wet, use a fine liner to extend lines out from there to build the structure of your web, then cure/dry.
– Connect these by adding links in between. I made mine somewhat rounded, and messy like a real cobweb, but you can experiment here to find a style you like!
– Optional: You can add a spider by making a dot for the body and 8 thin lines extended out from there.
– Apply top coat and cure/dry.
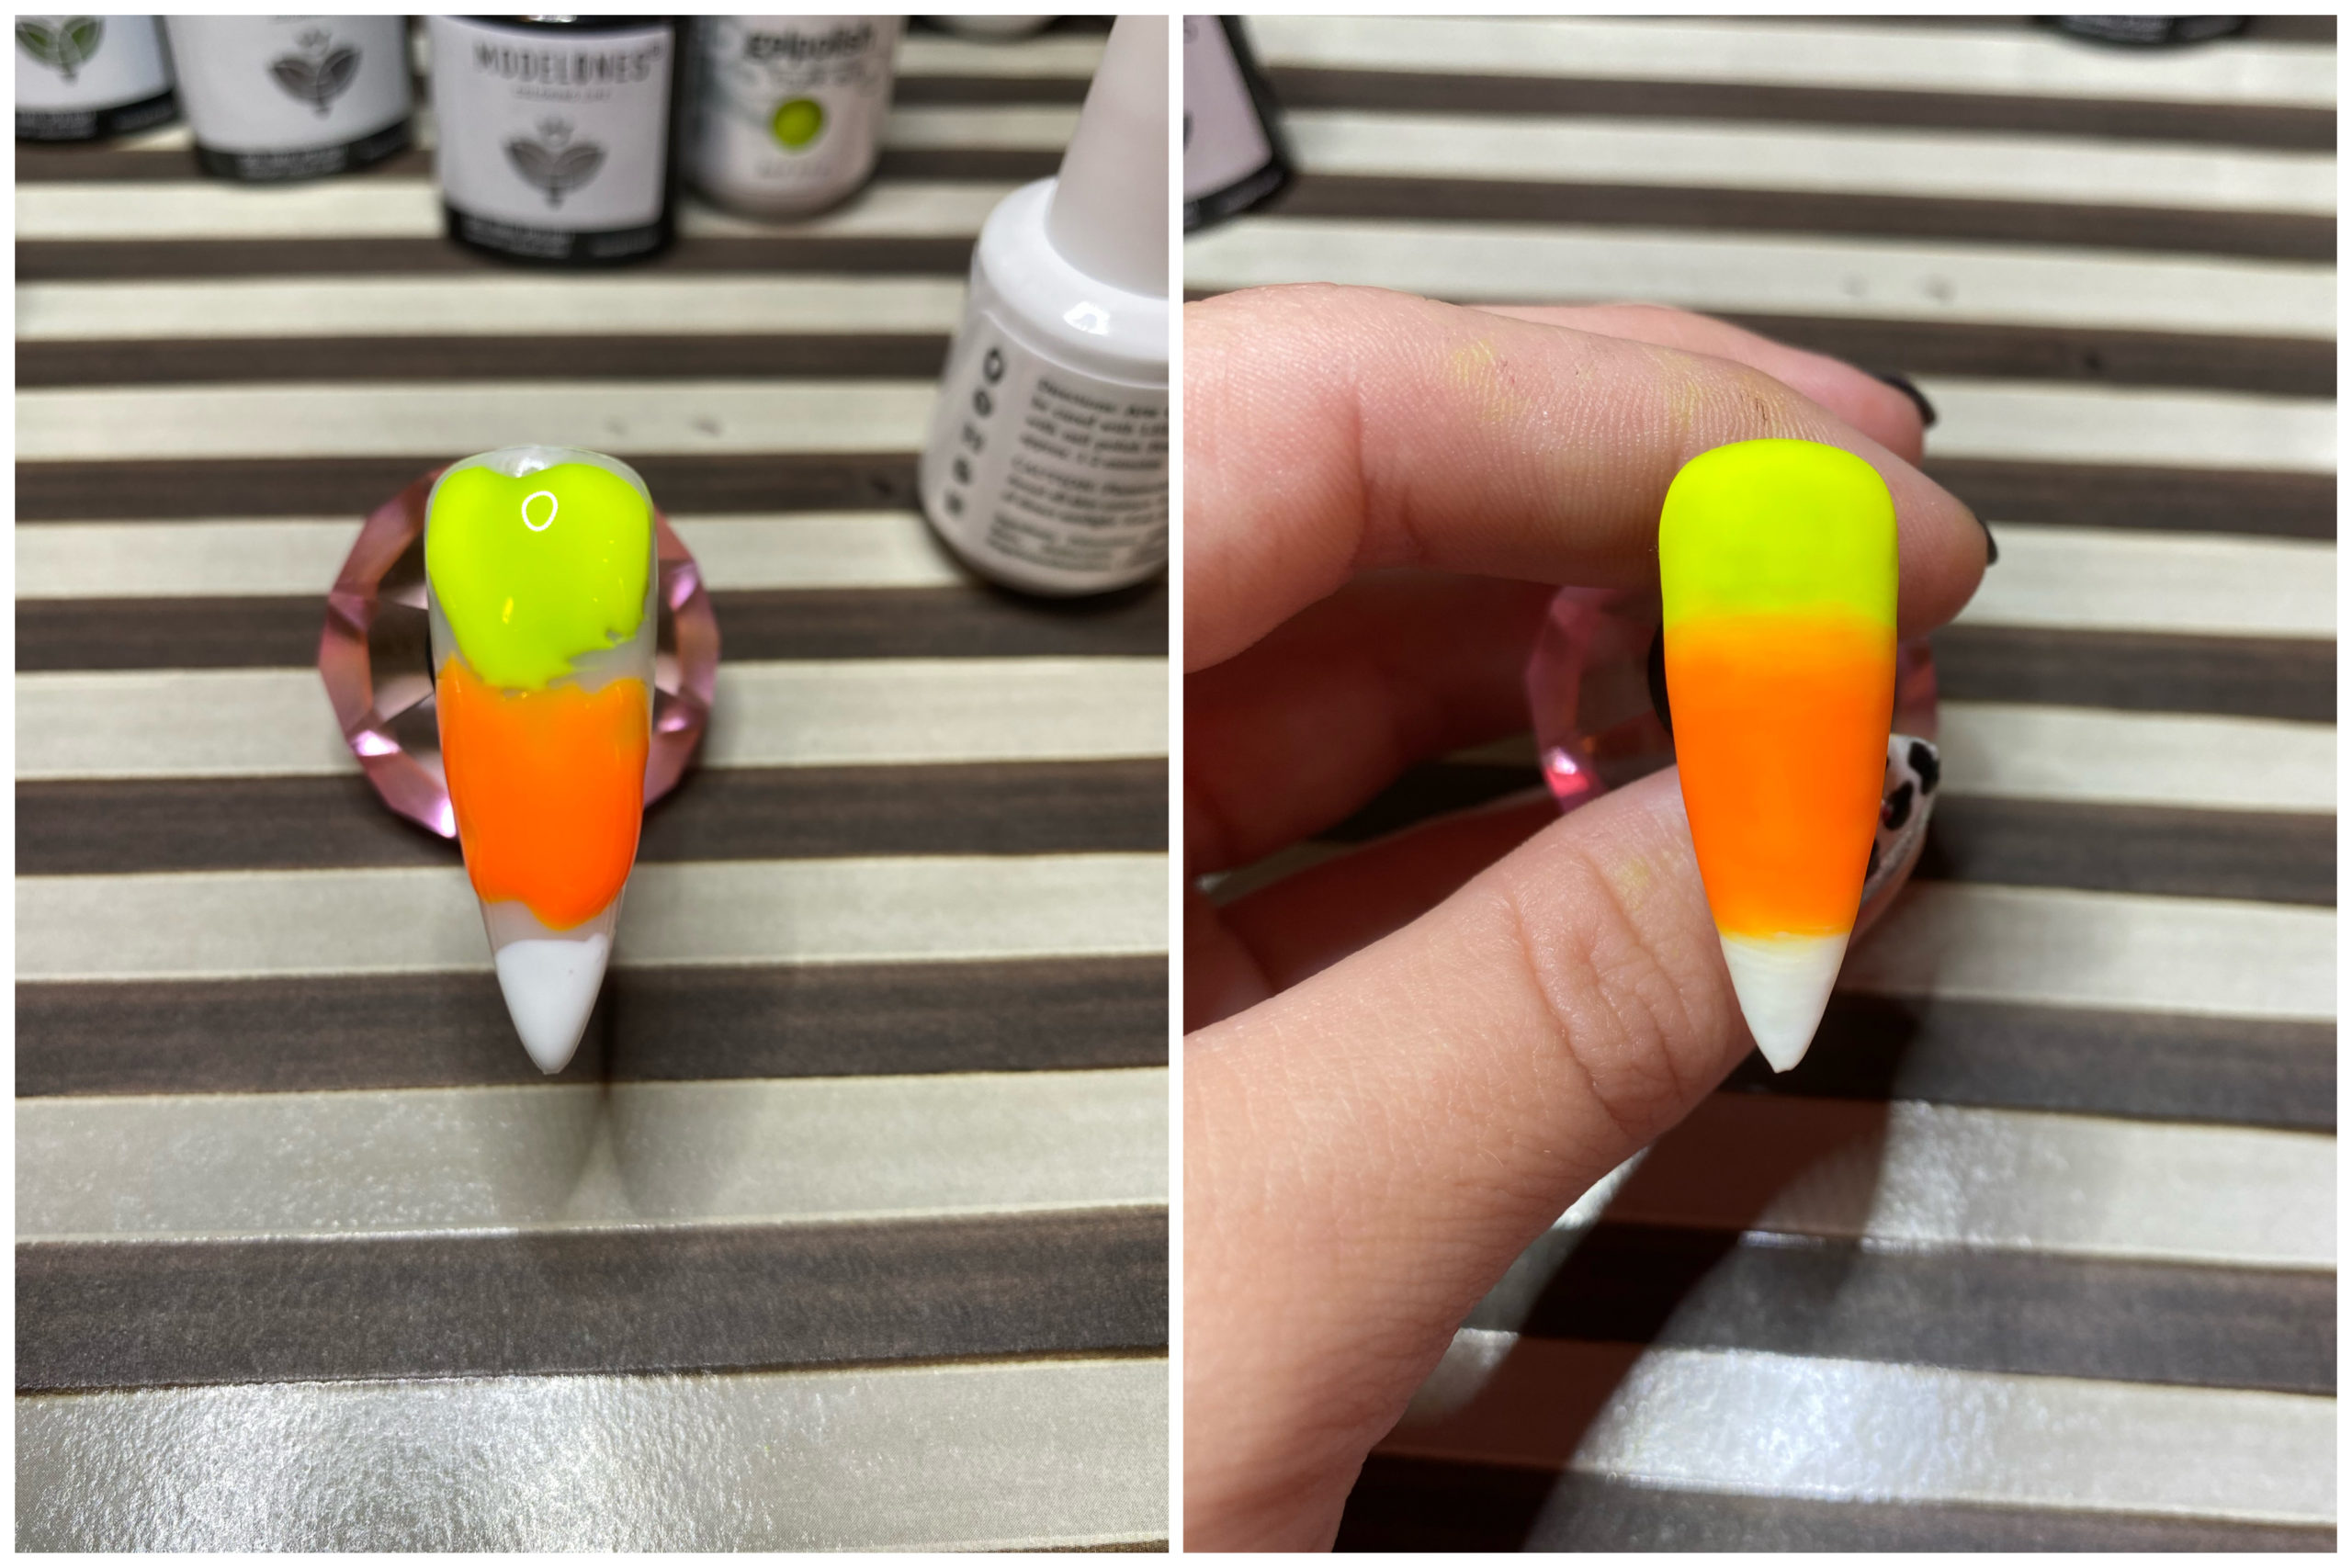
3. Candy Corn Chic
– Apply your base coat and cure/dry.
– Paint horizontal lines of neon yellow, neon orange and white, making the orange thickest. We’re doing a gradient, so don’t worry about making it neat.
– If your orange and yellow are a little see through, you can paint a thin base layer of white first.
– While the polish is still wet, take a fine liner, and blend the yellow/orange border, then the orange/white border with quick, light, horizontal strokes. You can add small amounts of color as needed until you’re happy with the blend.
* Note: An alternative method is blending the colors on a beauty sponge and then dabbing on the nail. I prefer using brushes for less clean up, but experiment and use whatever method is easiest for you! You can also just make the borders clean instead of blended.
– Apply top coat and cure/dry. I chose matte to mimic the texture of real candy corn.
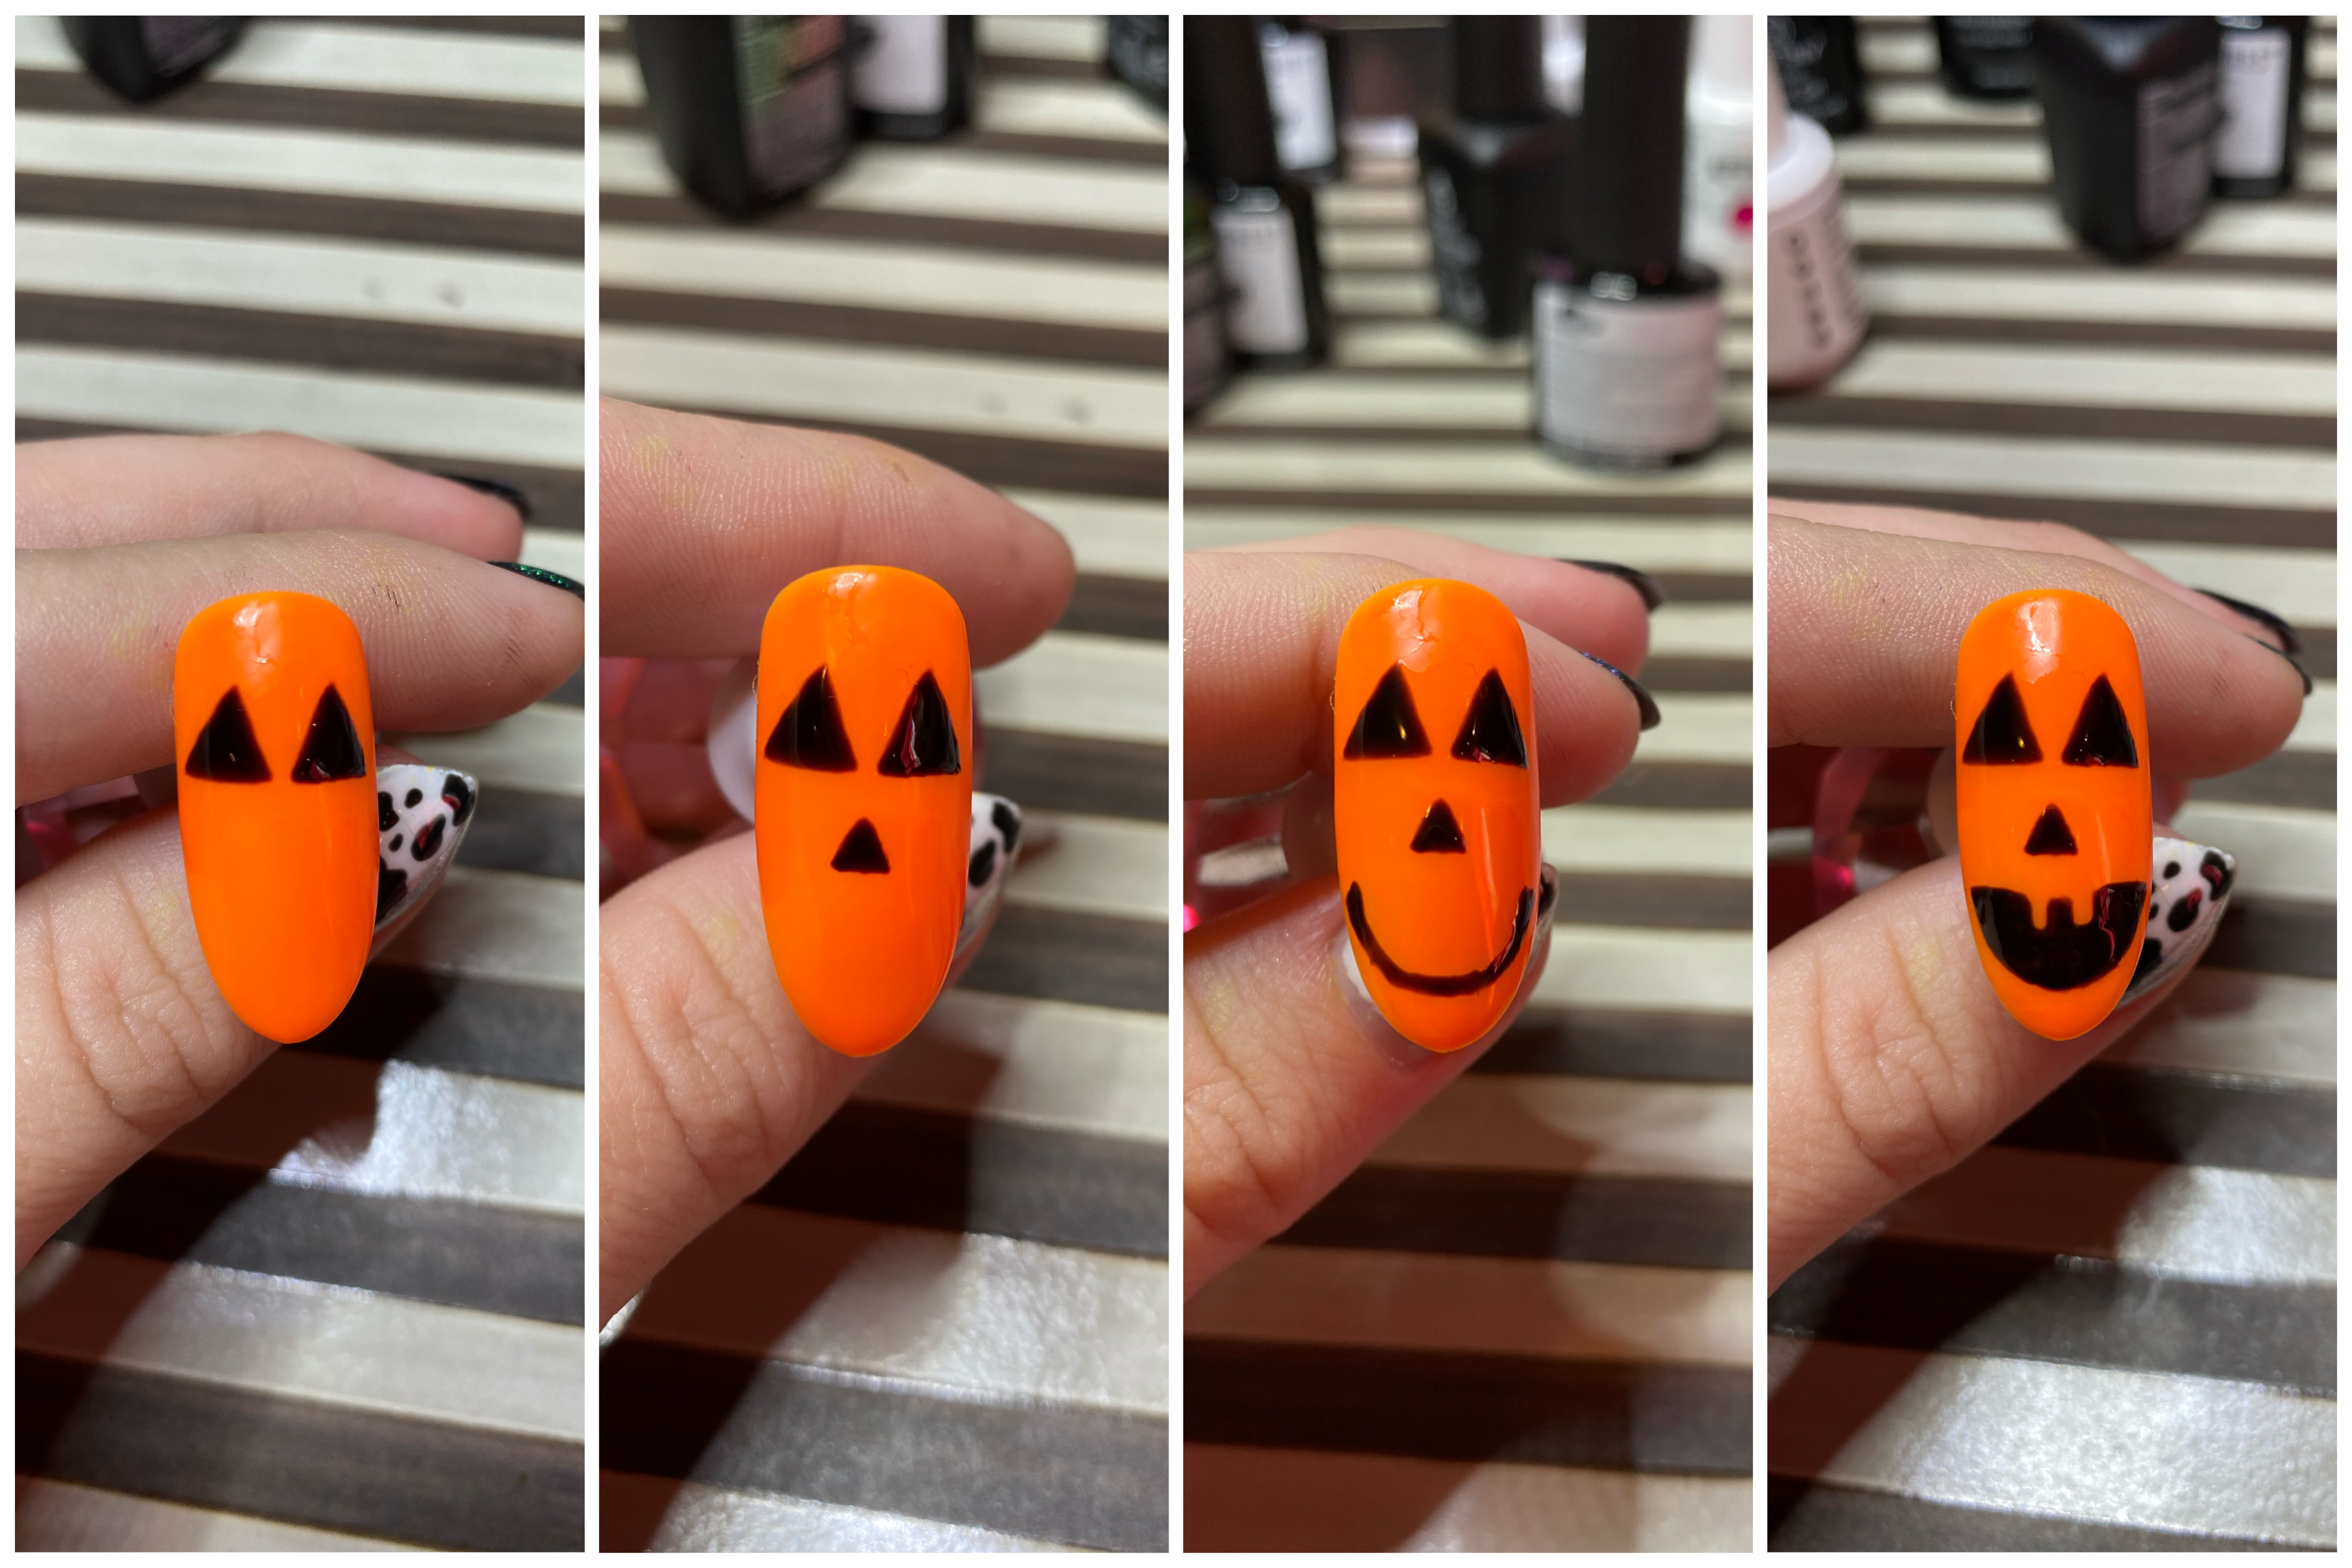
4. Pumpkin Carving
– Apply your base coat and cure/dry.
– Apply 1 or 2 coats of neon orange all over, then cure/dry.
– Use a small dotting tool to position your eyes, then shape them how you want with a fine liner. If you want one, add a nose with the same steps.
– With your fine liner, position a rough outline for the mouth where you want, and then shape as desired, then cure/dry.
– Apply top coat and cure/dry.
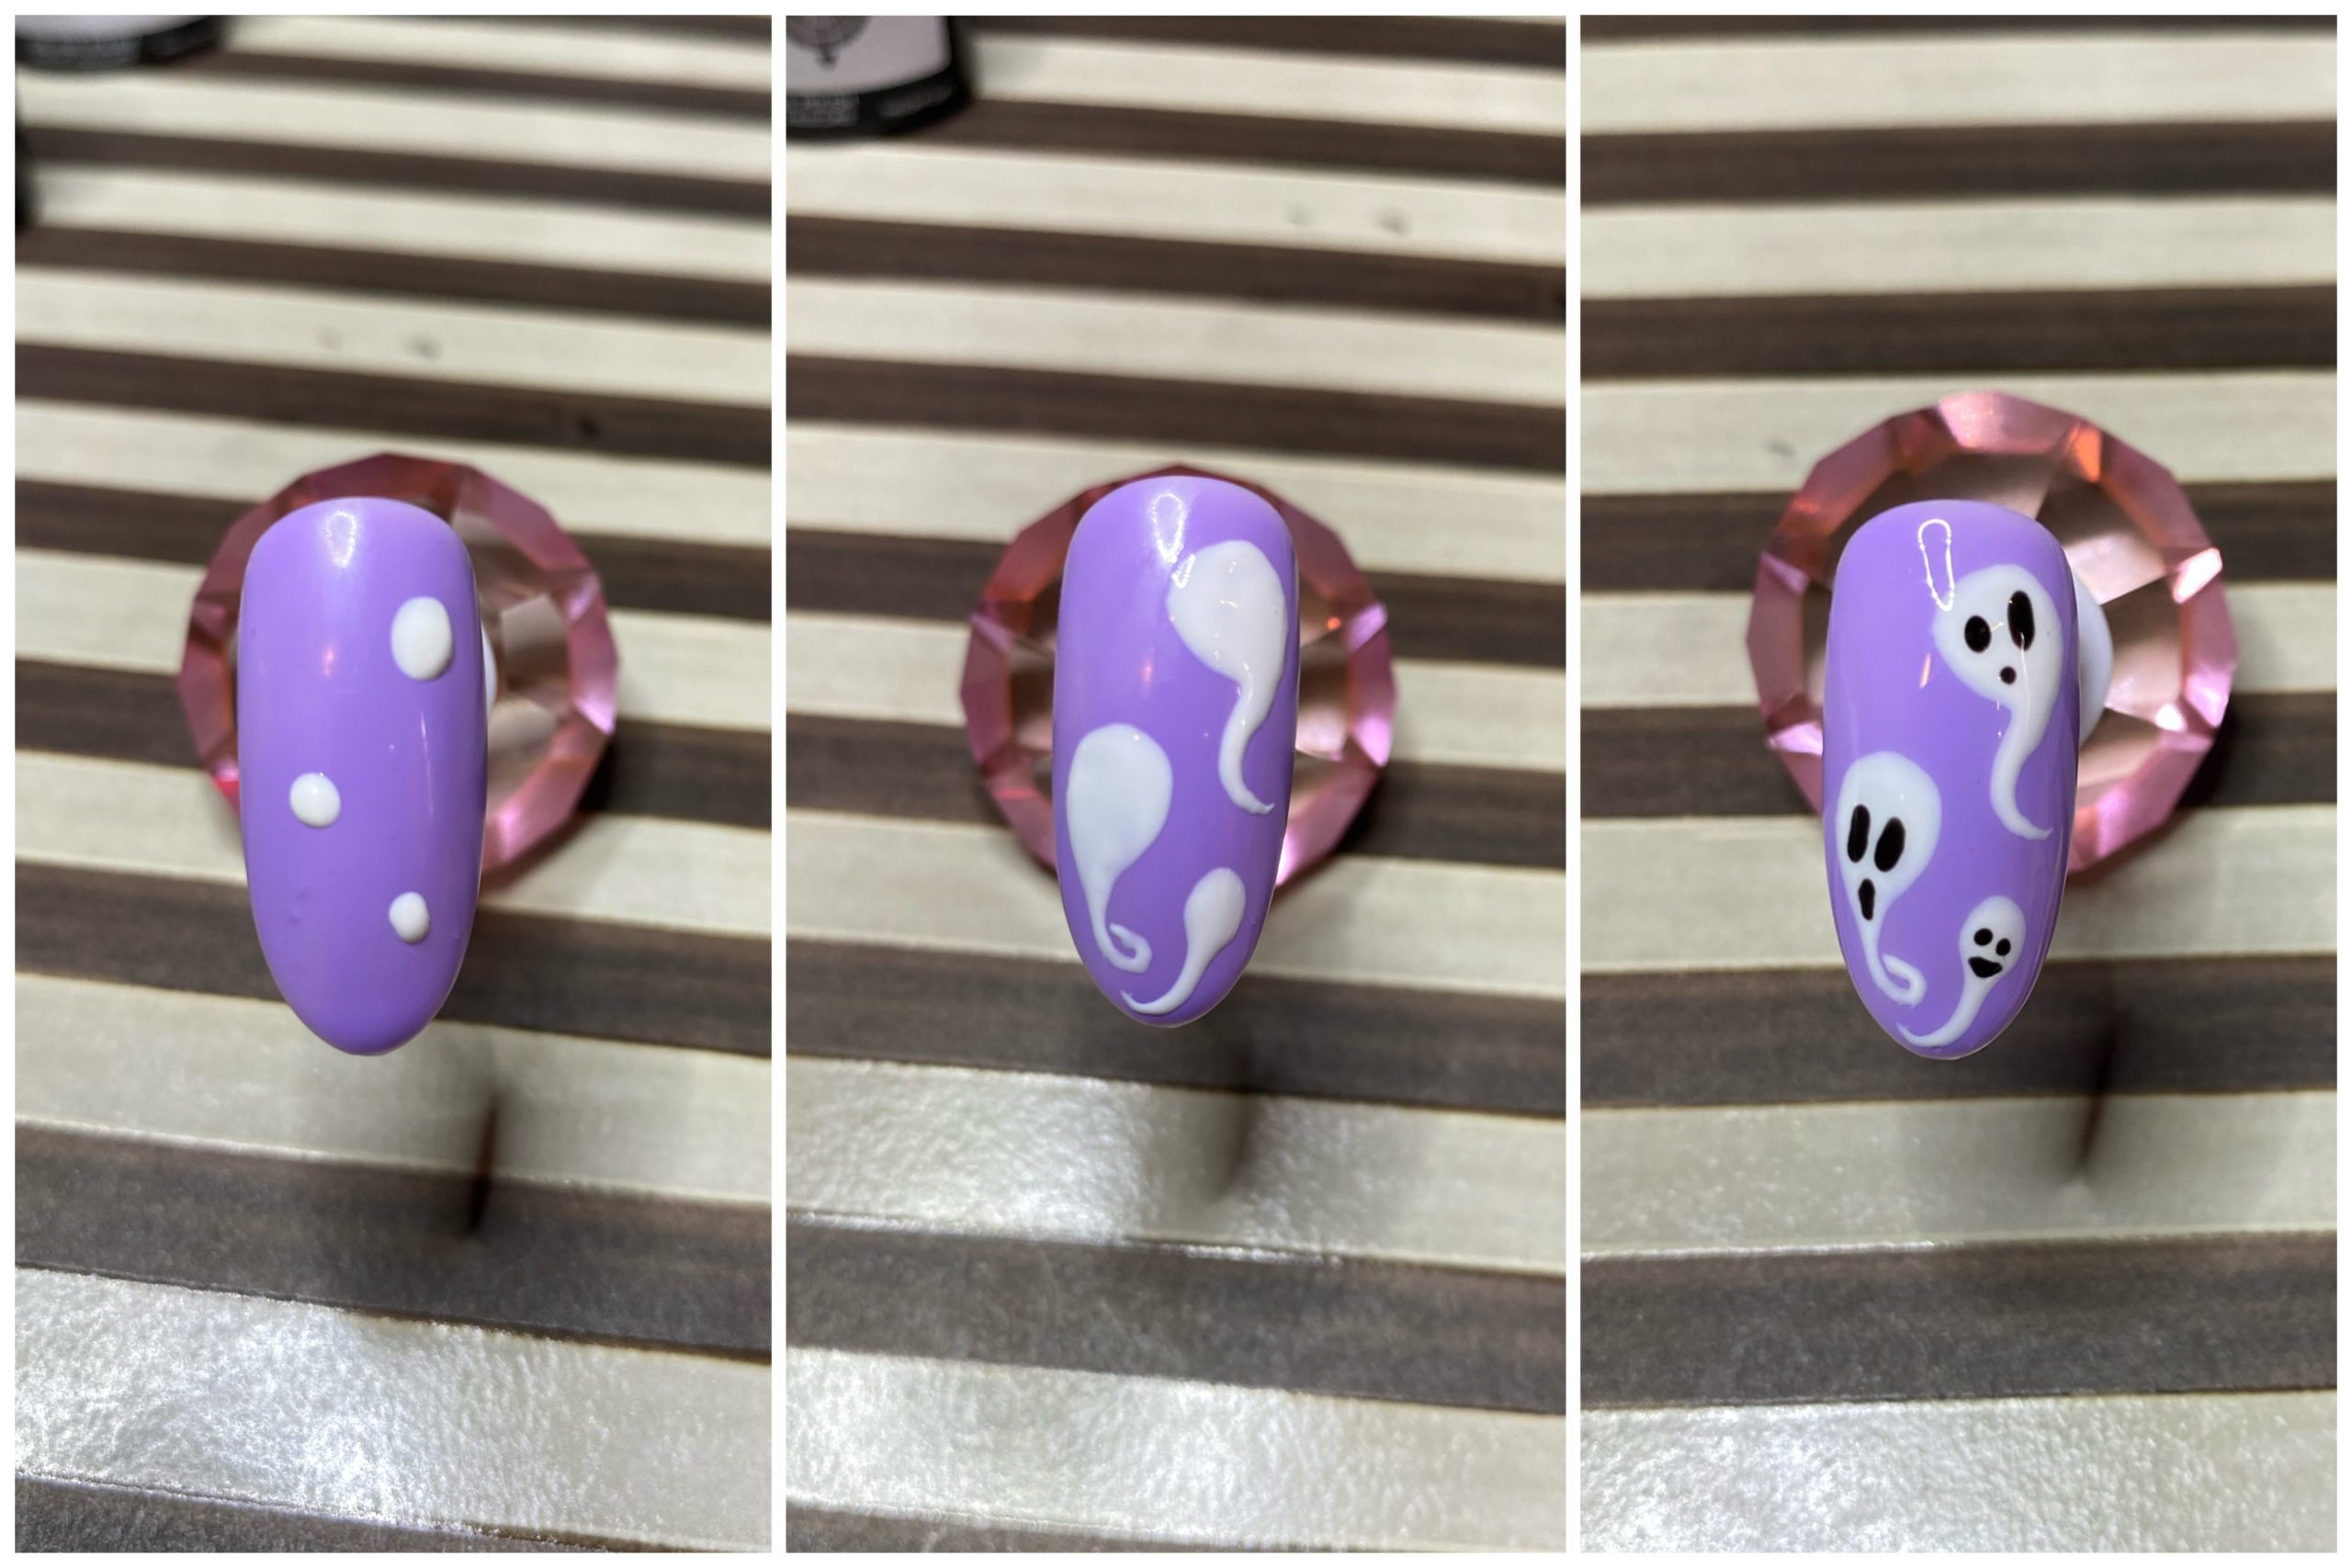
5. Poltergeist Cuties
– Apply your base coat and cure/dry.
– Apply 1 or 2 coats of pastel purple, then cure/dry.
– Use a dotting tool to place a few dots in different sizes at random parts of the nail, leaving plenty of room around them.
– While the polish is still wet, take a fine liner and shape the bodies how you’d like, then cure/dry.
– Use a dotting tool to give them expressions, then cure/dry.
– Apply top coat and cure/dry.
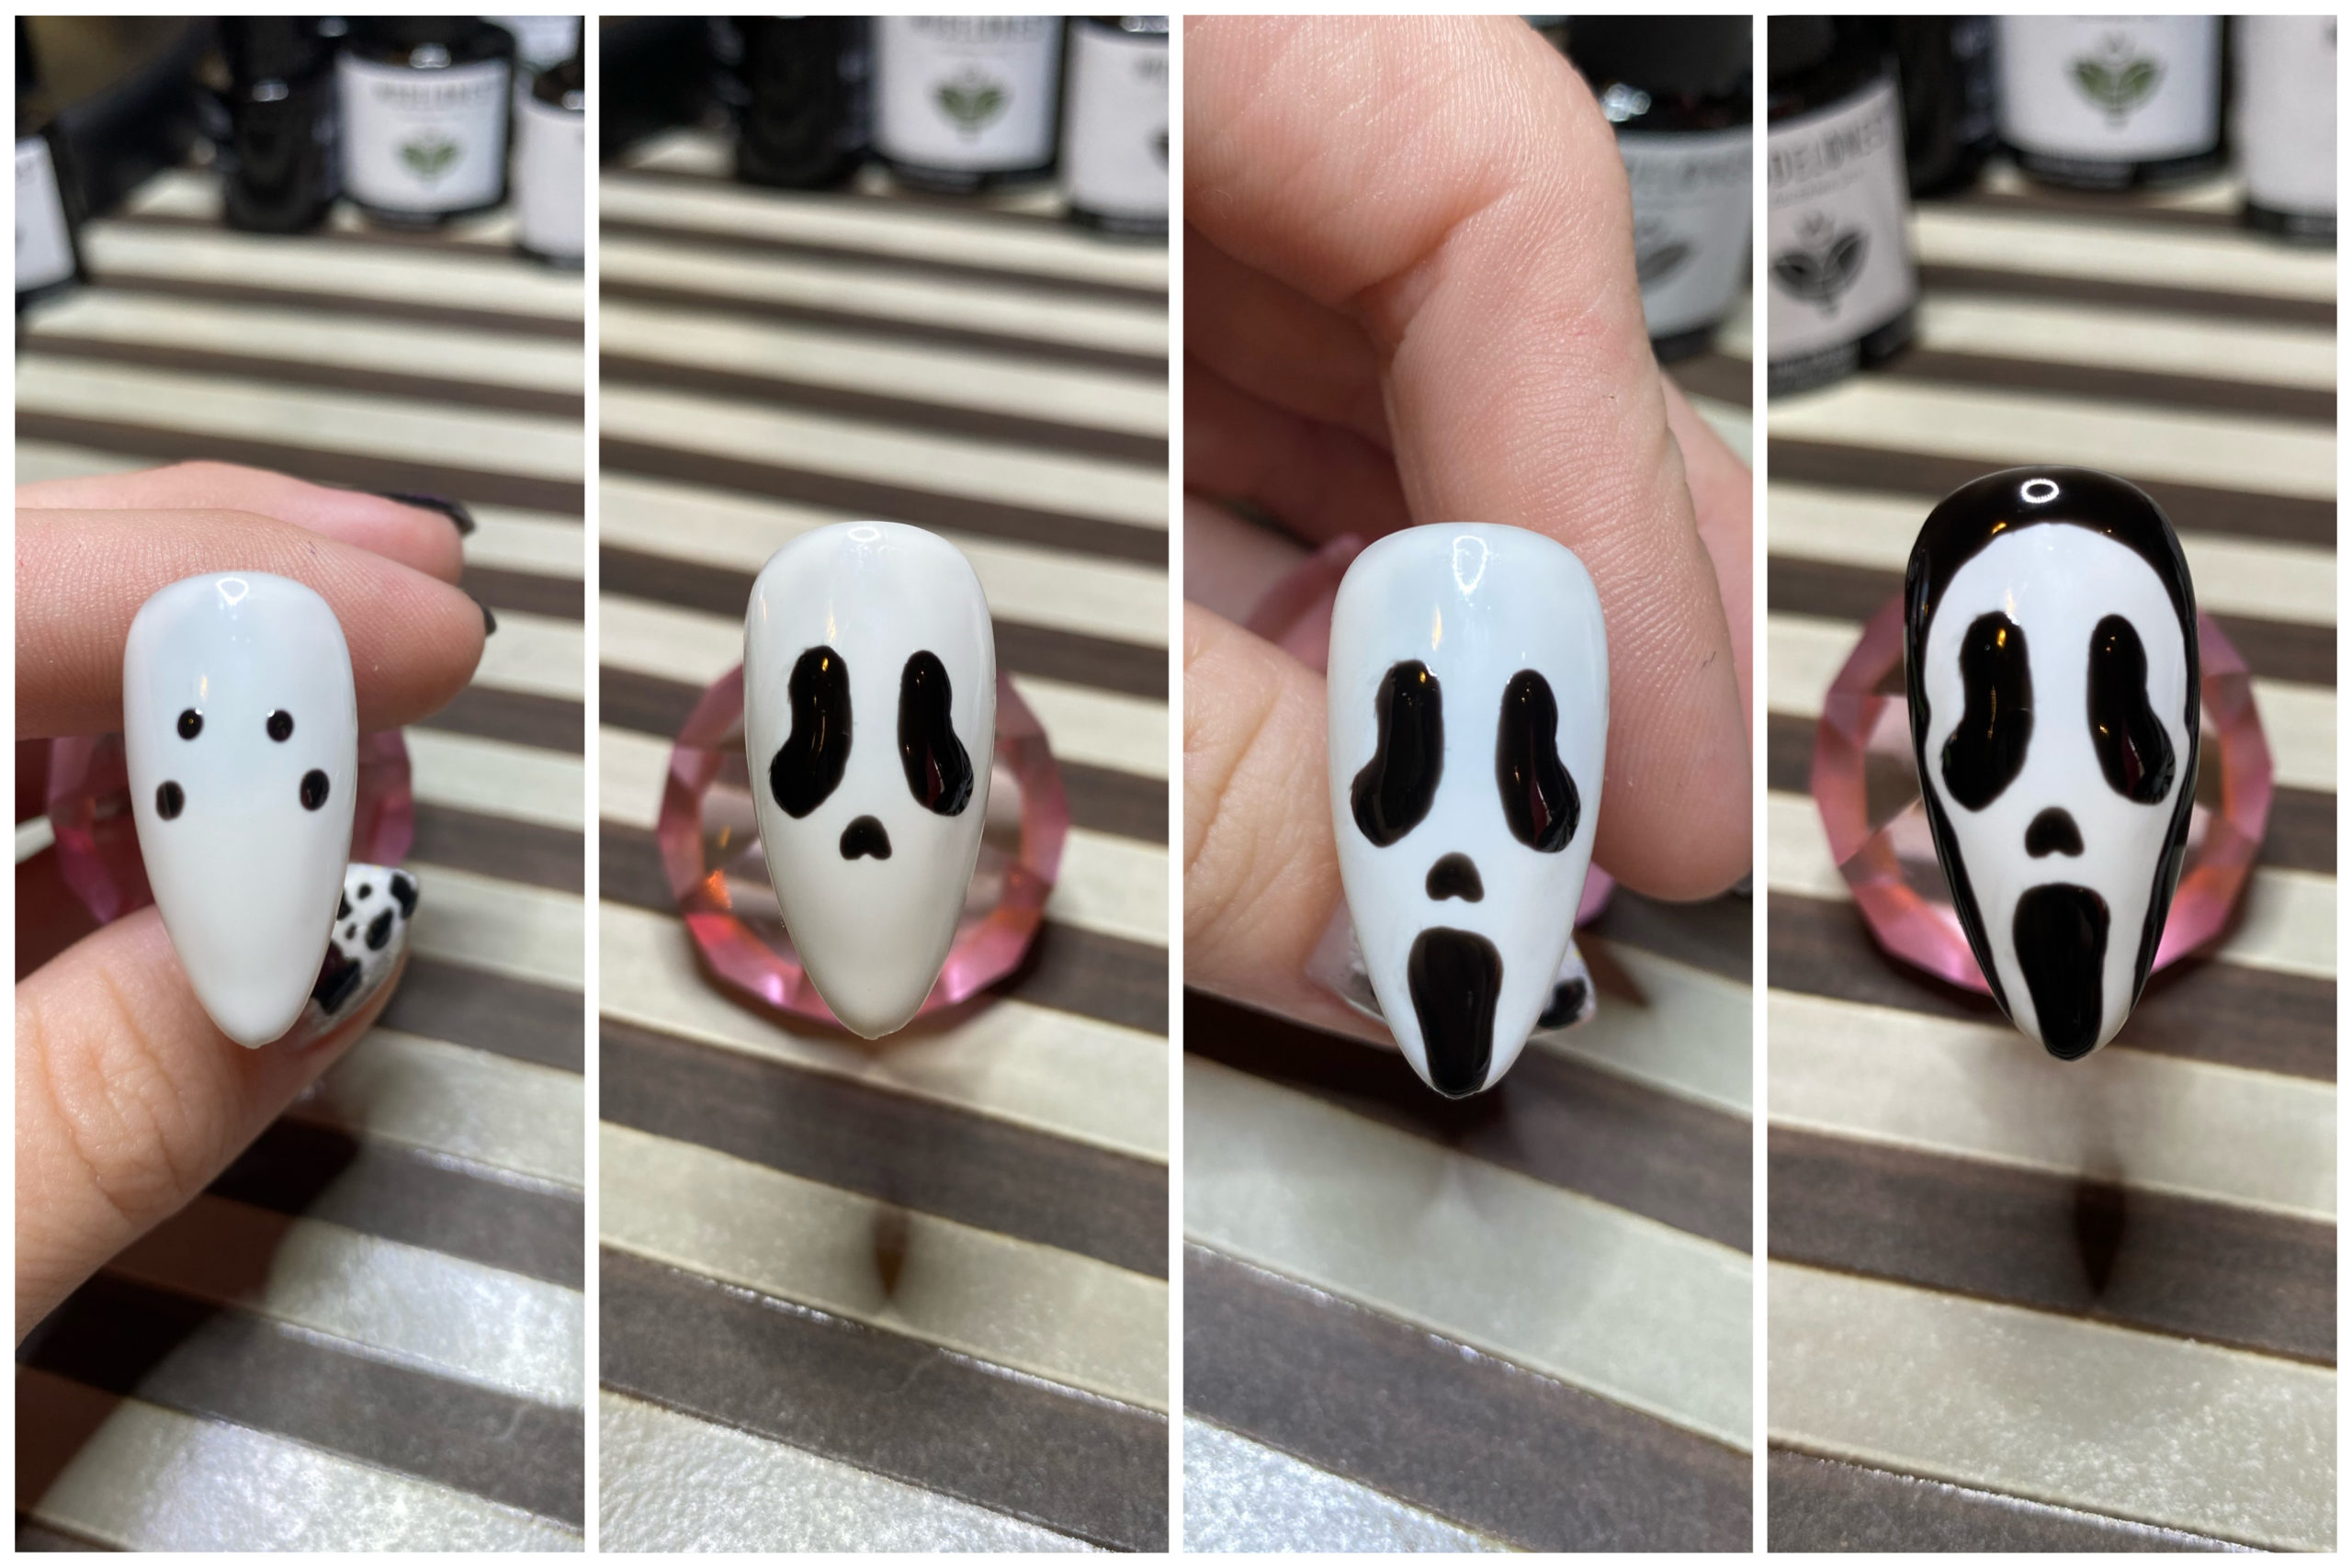
6. “What’s your favorite scary movie?”
– Apply your base coat and cure/dry.
– Apply 1 or 2 coats of white, then cure/dry.
– Place two dots roughly where you’d like the eye to go, having the bottom dot slightly farther left or right than the top. Connect with a fine liner to shape the eyes, they should be roughly bean shaped.
– Add a tiny upside down heart for the nose.
– Place a dot for the start of the mouth, and then extend it with a fine liner.
– Paint black around the perimeter of the nail to form the cloak and the cheekbones of the mask.
– Apply top coat and cure/dry.
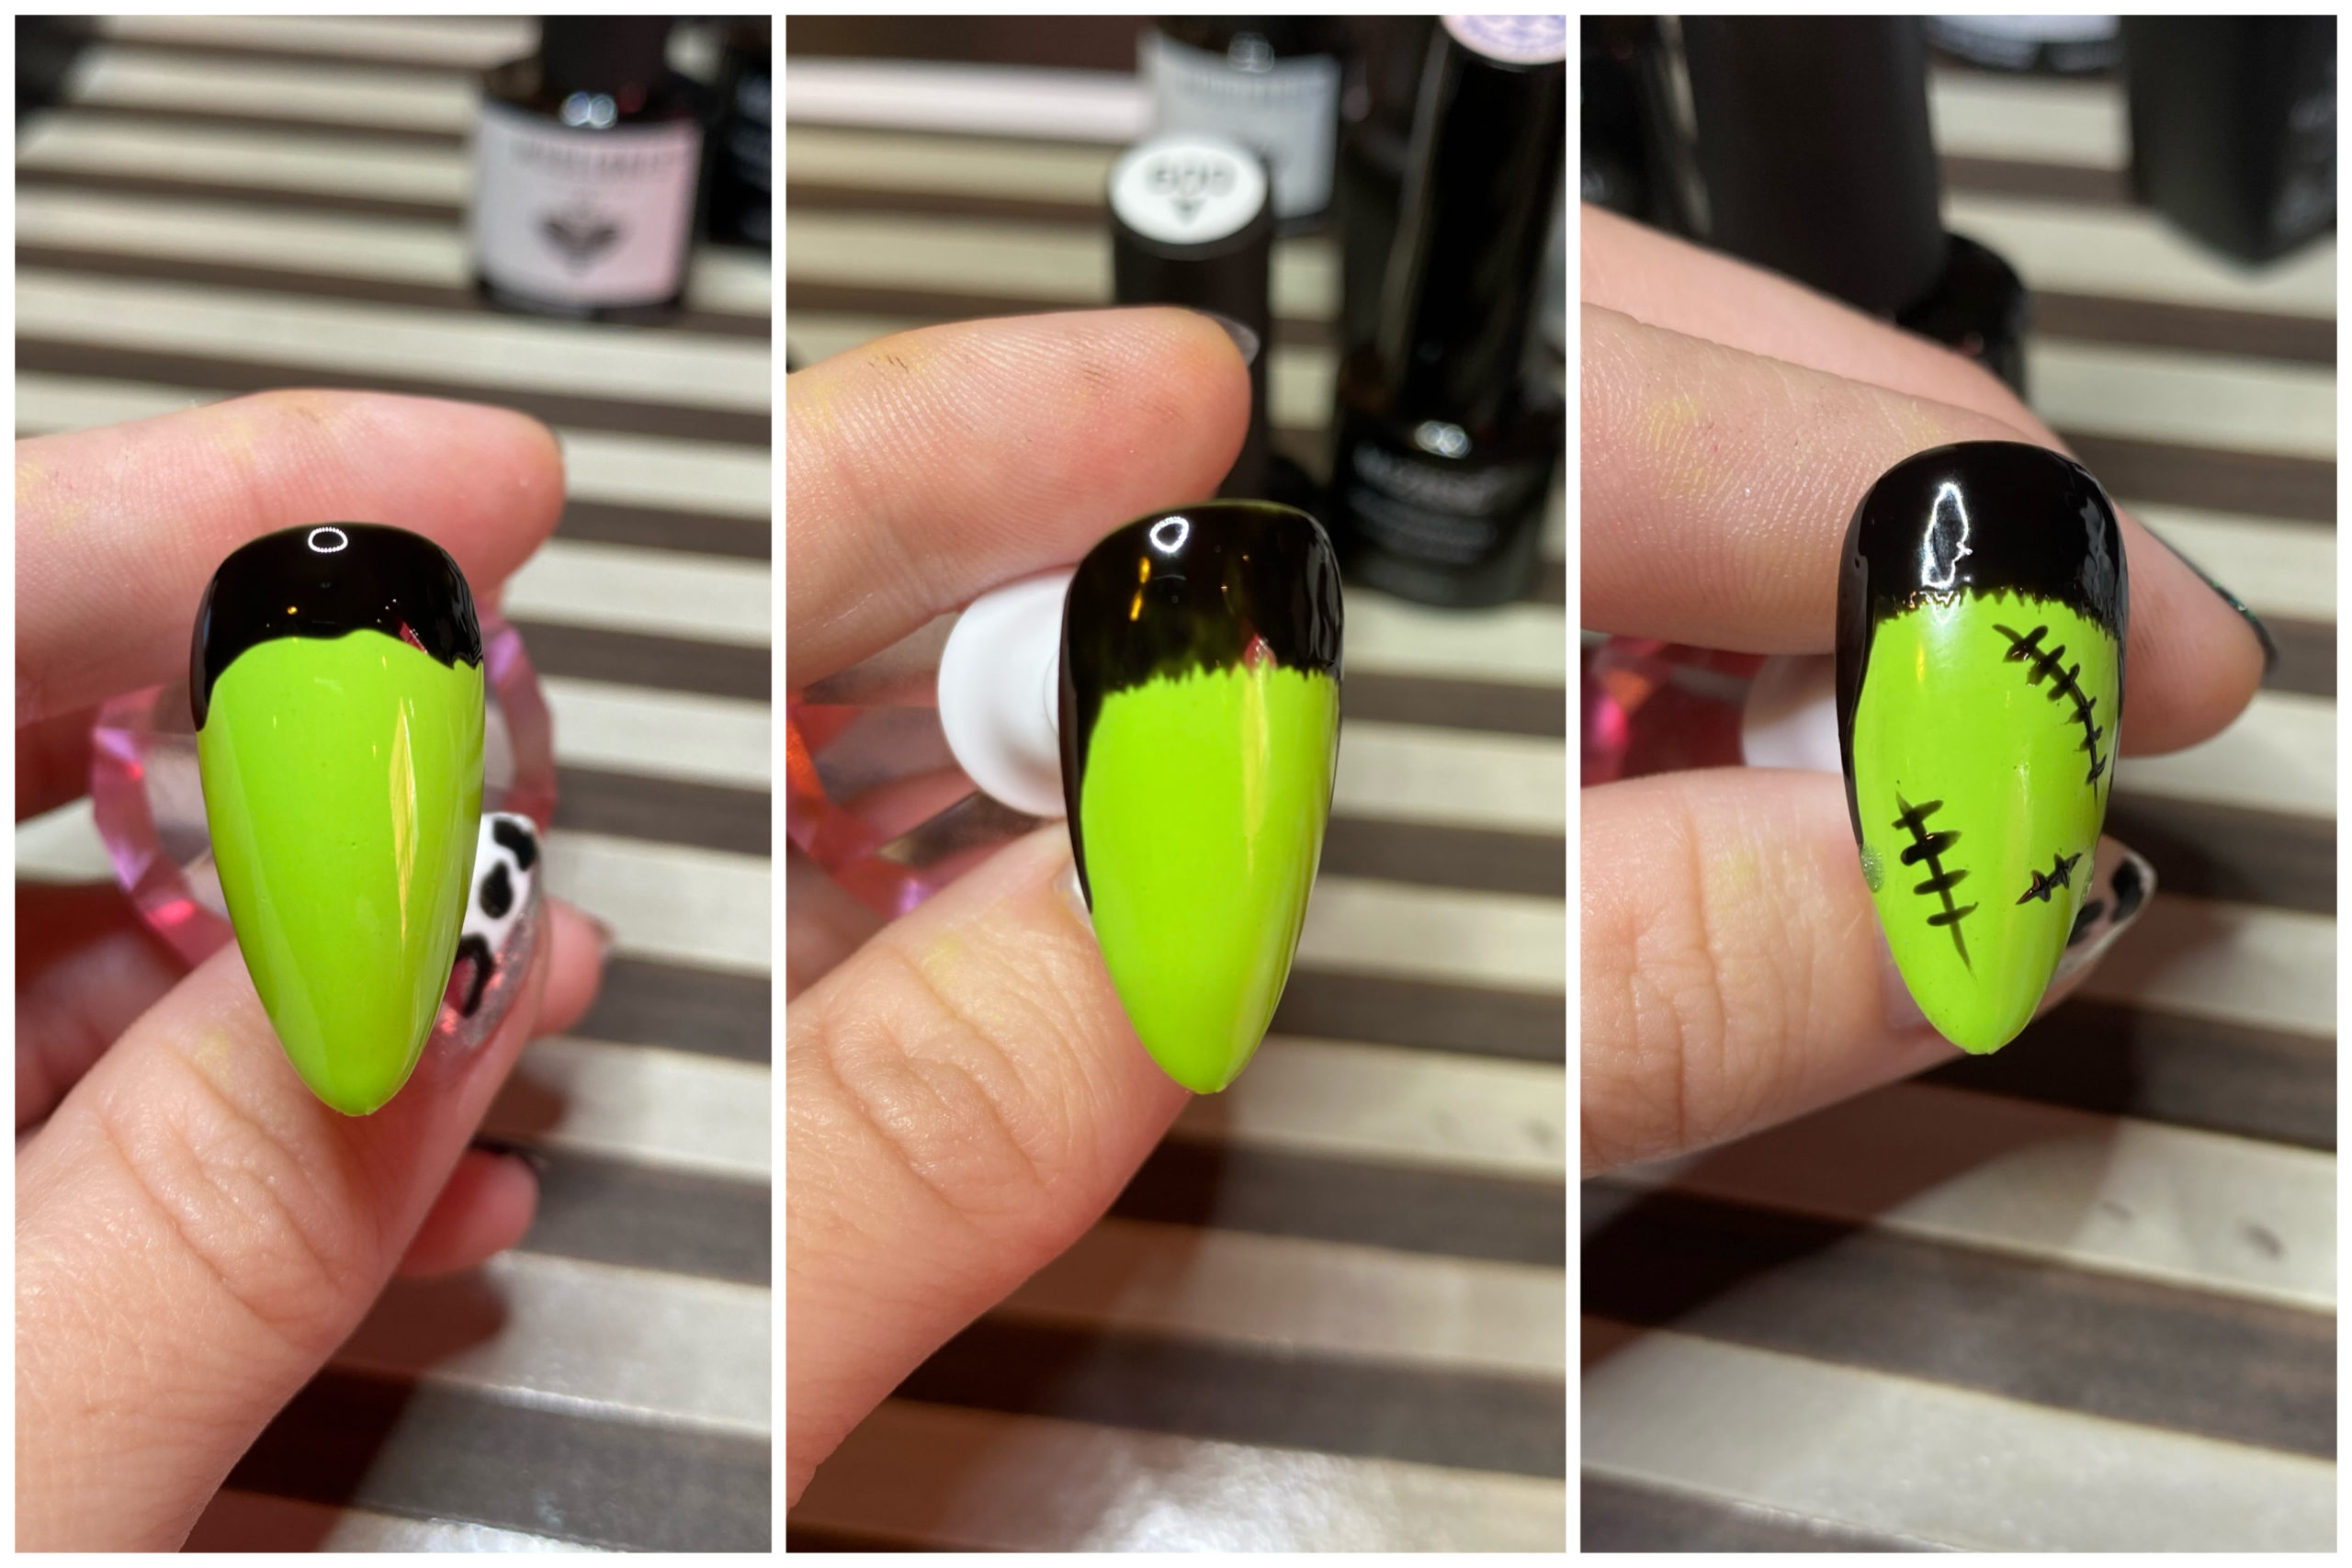
7. “Actually, it’s Frankenstein’s Monster”
– Apply your base coat and cure/dry.
– Apply 1 or 2 coats of light green, then cure/dry.
– Paint a black line around the top edge of the nail.
– While the polish is still wet, use a fine liner to blur the edge of the line to create his bangs, and extend two lines down the sides to give that square head illusion, then cure/dry.
– With a dotting tool, place a silver dot at the base of each sideburn and add a few black stitches in various positions, then cure/dry.
– Apply top coat and cure/dry.

8. “It’s frickin’ bats!”
– Apply your base coat and cure/dry.
– Apply 1 or 2 coats of gray, then cure/dry.
– With a fine liner, paint a few small, thin ovals in different positions, Then draw out the outline for the top of the wings.
– Add the bottom outline of the wings and fill in, then cure/dry.
– Give your little bat friends ears and add some squiggles for bats in the distance, then cure/dry. When bats are flying around it’s a big flurry, so don’t stress about making them all uniform!
– Apply top coat and cure/dry.
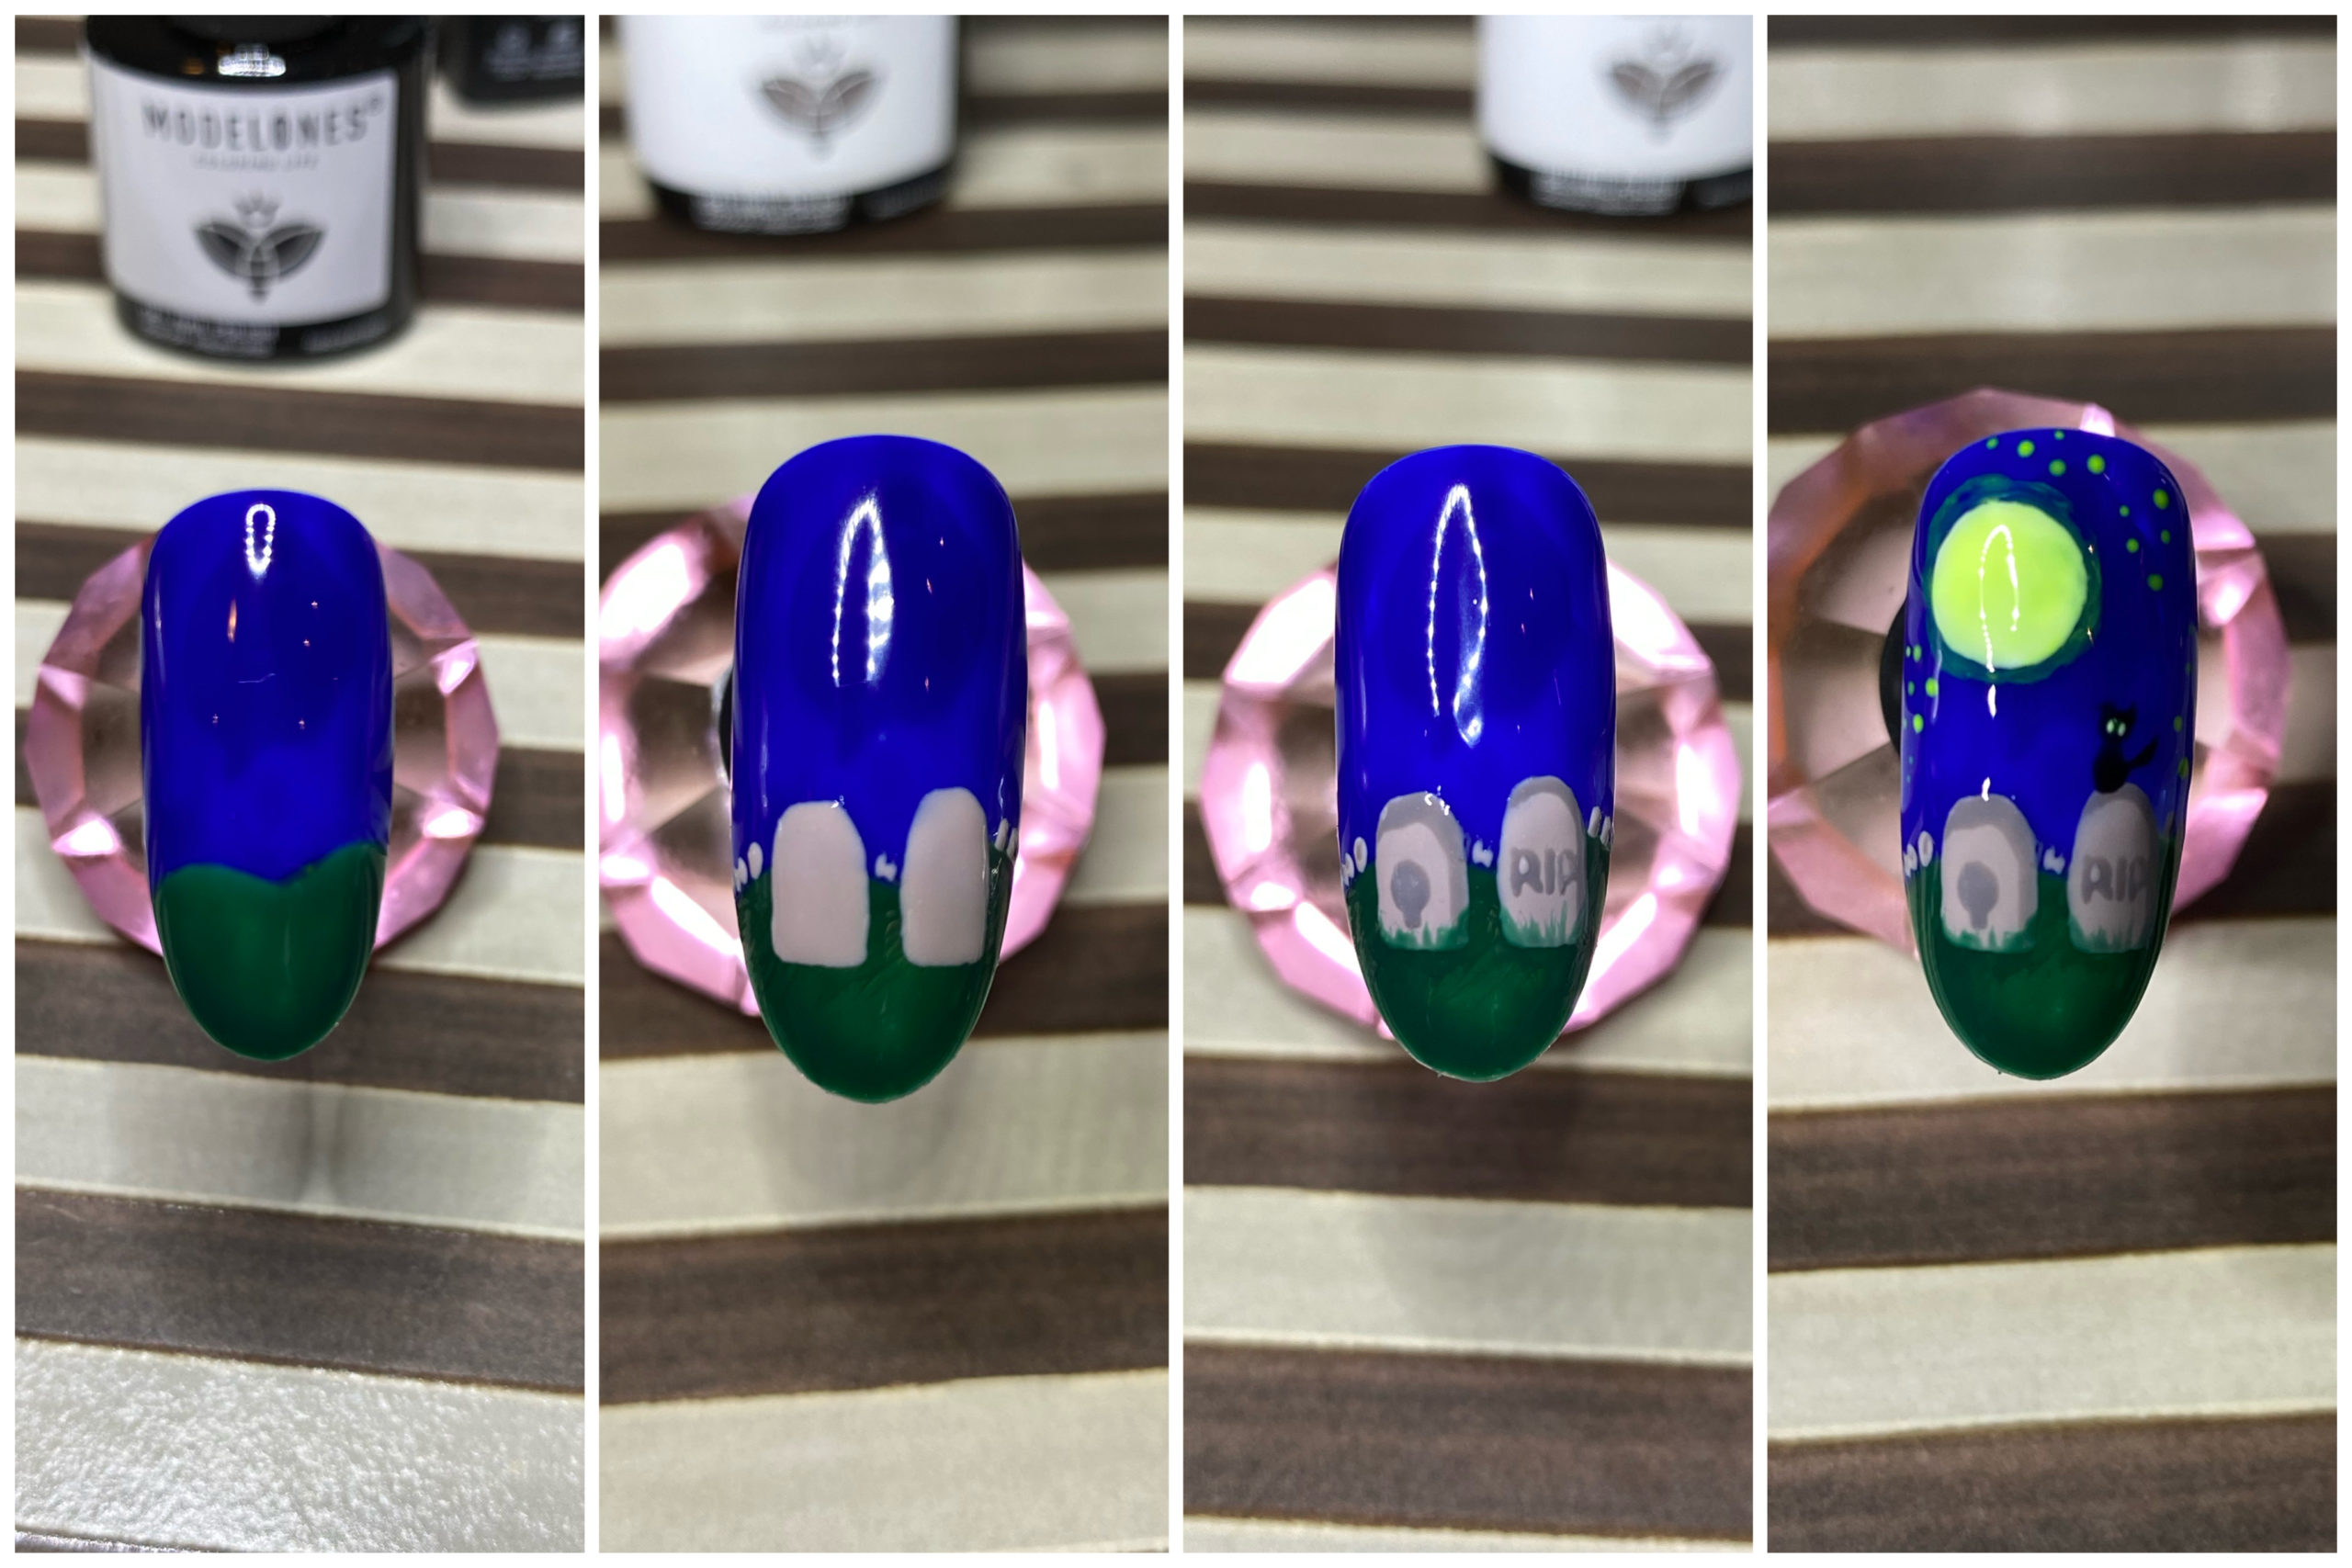
9. Goblin’s Graveyard
– Apply your base coat and cure/dry.
– Using a fine liner, make a swoop along the lower third of the nail in dark green and fill, then cure/dry.
– Fill in the top two thirds of the nail with dark blue, bringing the edge down to meet the green, then cure/dry.
– Using a light gray and fine liner, draw two gravestone shapes, and you can add small ones in the background if you’d like to as well, then cure/dry.
– Using a darker gray, line the grave stones and add RIP text and a little skull, and add a little bit of grass around the base with the dark green, then cure dry.
– Embellish! I added a moon, stars and a tiny version of my black cat Goblin.
– Apply top coat and cure/dry.
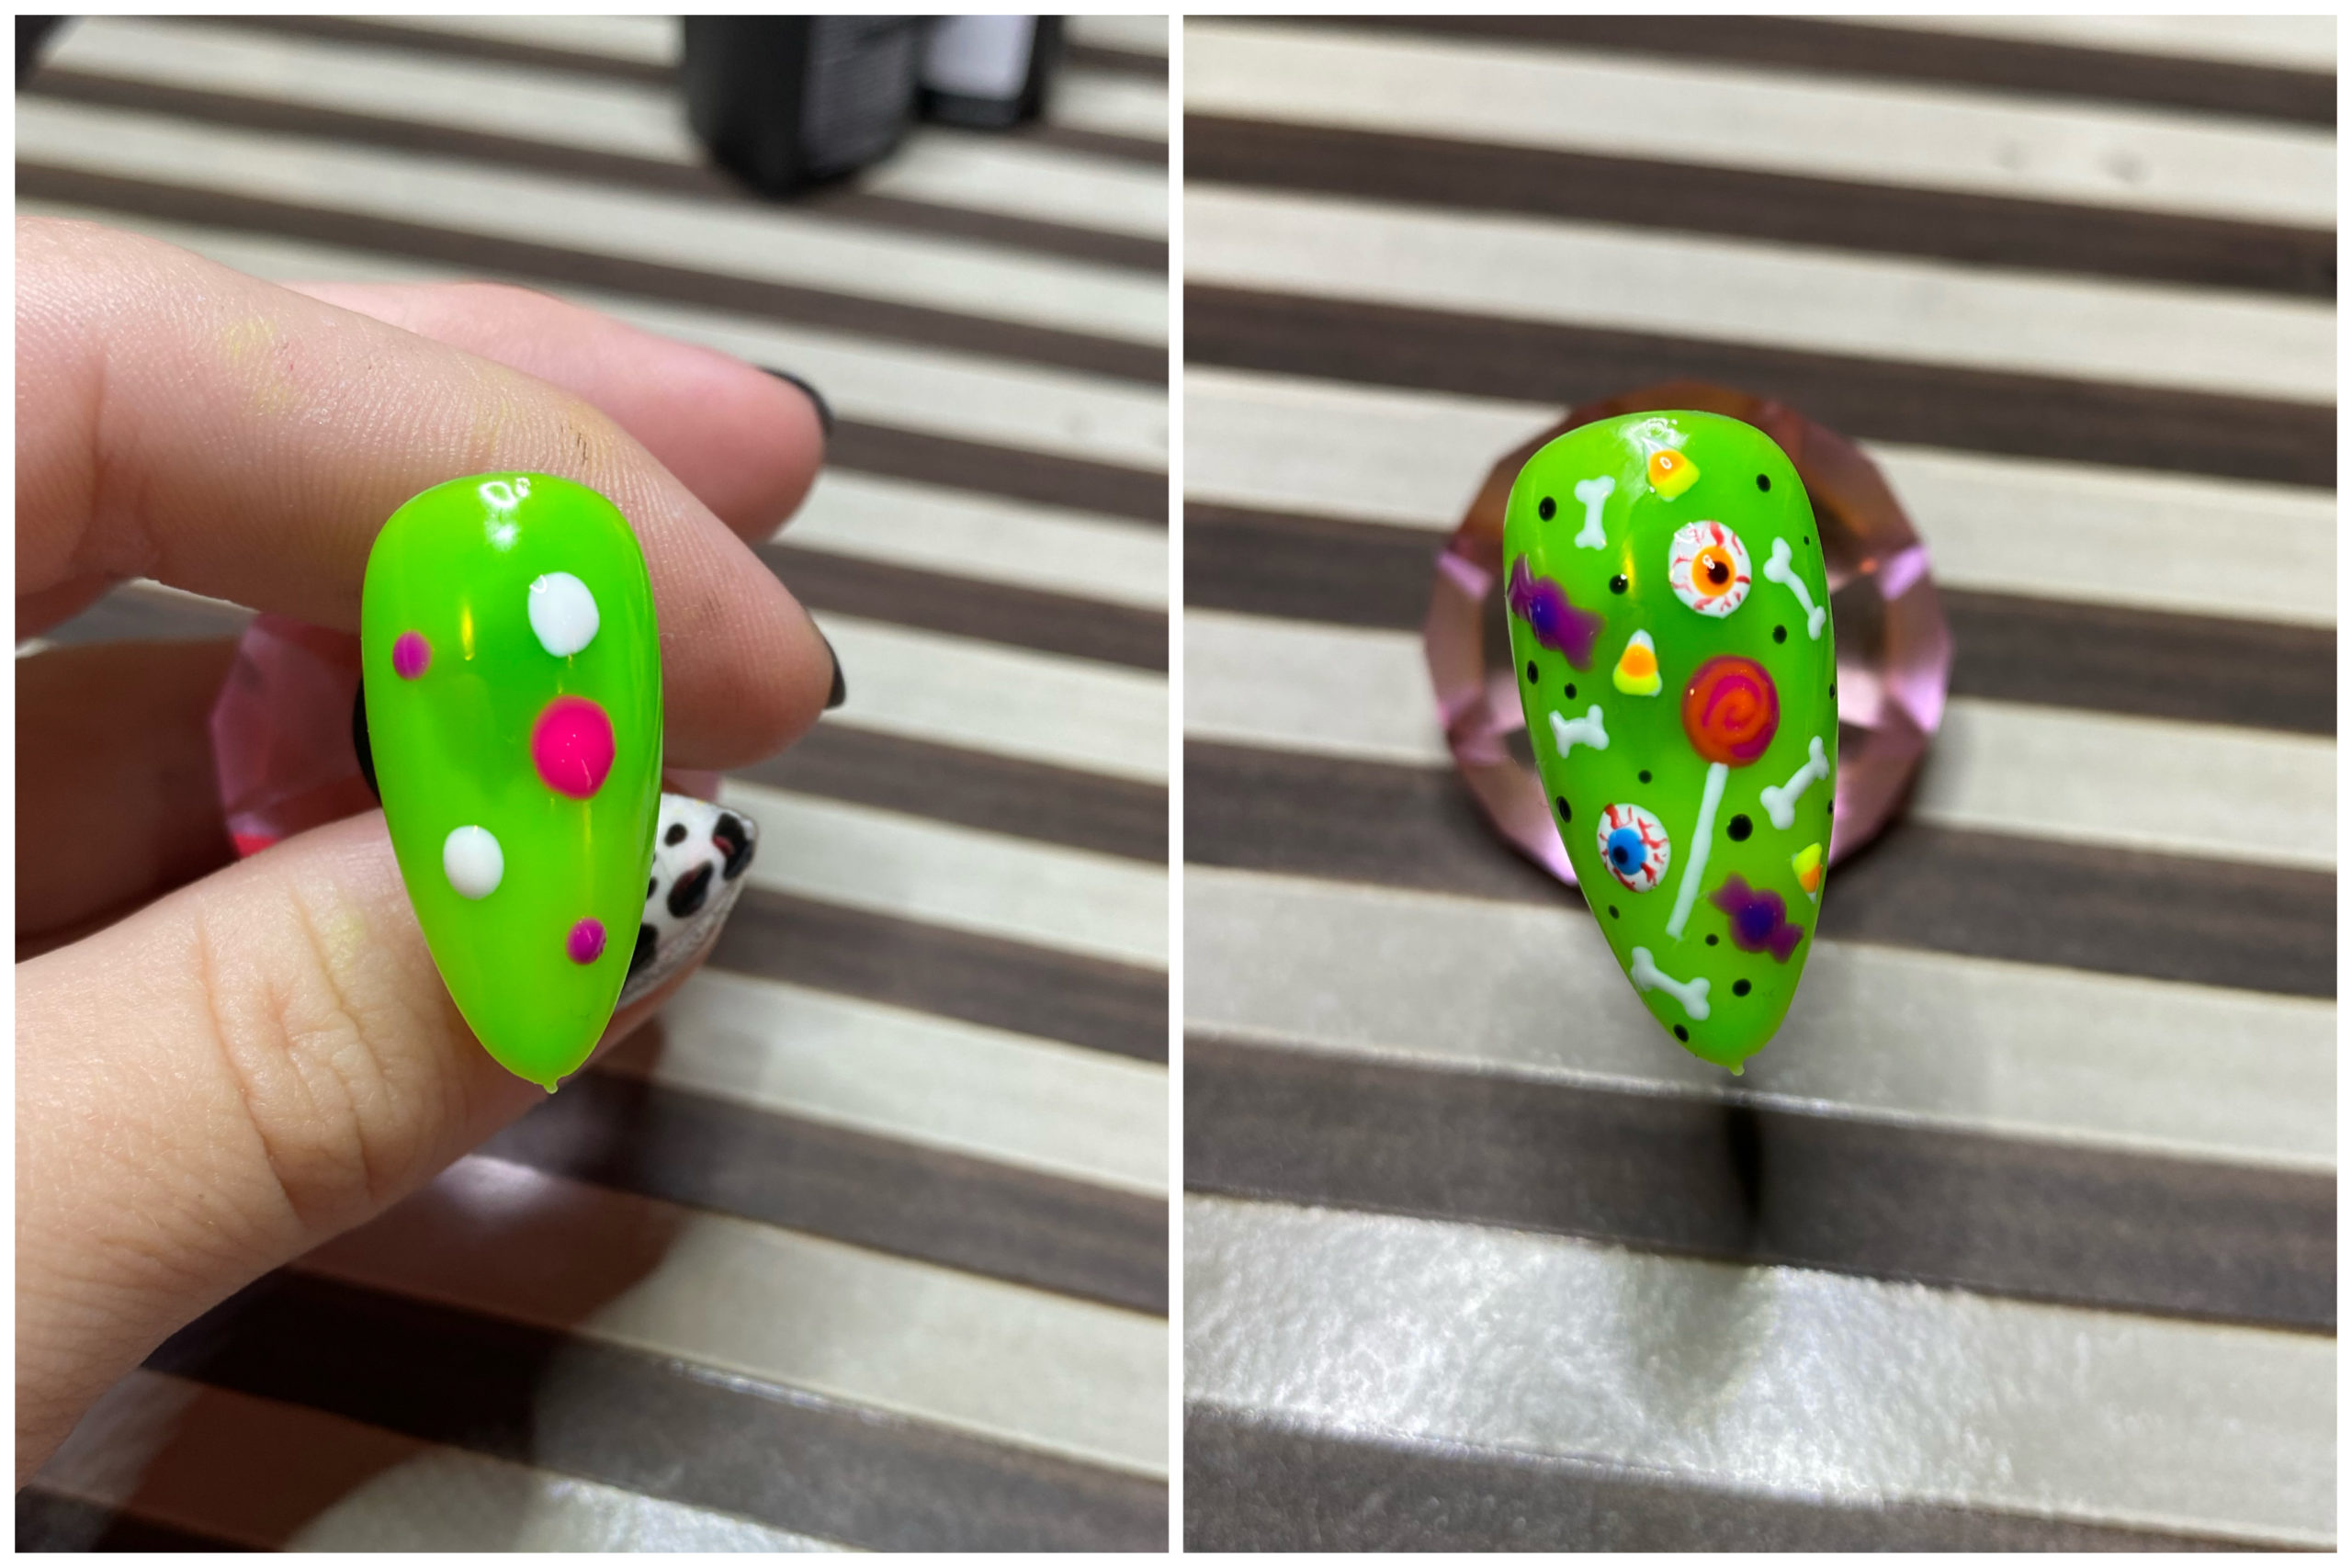
10. Trick-or-Treat
– Apply your base coat and cure/dry.
– Apply 1 or 2 coats of neon green, then cure/dry.
– Use the dotting tool to place a few random dots for candy and eyeballs, then cure/dry.
– Embellish! I added veins, an iris and pupil for the eyes, decorated the candies and added a sucker stick and candy wrapper. For fillers I added bones, dots and some tiny little candy corns. All of these are achieved with a fine liner and dotting tool. When you’re satisfied, cure/dry.
– Apply top coat and cure/dry.
All right Iggles, there you go! I hope these tutorials have sparked some ideas for you! I can’t wait to see what y’all create, and would love to see your finished art. I’m also available if anyone has questions about these tutorials, don’t hesitate to reach out!
Contributed by Vic
Vic is an Oklahoma based nail artist with strong opinions about which Pokémon are cutest. They love their cats, The X-Files, Doctor Who, and cryptids, and spend their time crafting, watching cartoons, dancing, and yelling about aliens. You can follow their progress through nail school on Instagram @nailsinpurgatori, or @lifeinpurgatori for general tomfoolery.
Leave A Comment
You must be logged in to post a comment.